It is almost a rite of passage that at some point in time a woodworker should construct their own workbench. While it can seem like a bit of a daunting task–especially since you will ultimately rely on it for all of your future woodworking projects–building your own workbench is really the only way to go.
Aside from the fact that you can have pride from having built your workbench by hand, there is a host of other benefits and reasons for why you should build your own workbench. In this article, we will run through some of the best reasons why you should build your own workbench.
Customization
Everyone has their own ideas of what the best workbench should be. While there may be one or two workbenches that you can buy that entice you, chances are there are at least a couple things about the workbench that you would change if you could. Thankfully, if you build your own workbench, that is no longer an issue. By building your own workbench, you are given the freedom to design it however you want.
Workbench Height
It is important that your bench fits you and the way you work. A bench that is too high or too low for you can lead to back aches, or worse. You might consider an Adjustable Height Workbench. Regardless, please be sure that your bench is the right height for YOU.
David’s DIY Adjustable Height Workbench
Workbench Size
Not all people have the same amount of space in their workshop. Some people might be lucky enough to have a glut of room in which to work, but most people have to deal with the reality that workshop real estate comes at a premium. Of course, if you build your own workbench, you make it as large or as small as you desire.
Workbench Design
This can be approached from a couple different angles. First, if you are already somewhat of a skilled woodworker, you can ensure that your workbench is truly a piece of art. By adding a number of aesthetic touches, your workbench will stand out as a unique piece that has not been replicated elsewhere. This alone can make the workbench become a family heirloom to be passed down from generation to generation.
Of course, the other primary design benefit to building your own workbench is the fact that it can have whatever additional qualities you decide. If you need more storage space than most workbenches provide, that is no longer an issue. Holes and dowels are also left up to your imagination and the physical limitations of your workpieces. You can also add some genuinely practical and high-quality vices.
Bench Quality
One of the biggest reasons to build your own workbench comes down to craftsmanship. While there are plenty of manufacturers that produce high-end workbenches, they often tend to be well over $100 dollars. Once you start getting too low in price, you find that the quality of the workbench no longer justifies its price. By building it yourself, you can make sure that the workbench maintains a high standard.
Workbench Materials
One of the biggest issues with pre-bought workbenches is that they often use mid to low grade wood unless you are willing to shell out serious cash for quality hardwood. Even then, most pre-made workbenches get their wood from tree farms which rarely allow the wood to fully mature before harvesting it. When you build your own workbench, you are able to make sure you use only the best wood.
Techniques
Even if the company uses a decent quality of wood, that does not guarantee that they use the best techniques to construct or manufacture the workbench. One of the biggest issues with workbenches is that they are often not flat. By making it yourself, you can ensure that the workbench is both stable and flat. You can also go so far as to build it without using hardware to fasten it together–an uncommon practice for prefab workbenches.
Workbench Cost
This one can be a bit hit-or-miss. If you have access to high-grade hardwood that properly matured before being harvested, then it is a no-brainer: it is cheaper to build your own workbench. That said, if your region does not grow top-tier hardwood and you have to purchase imported wood, it will often be similar in price to a prefab workbench.
Practice
The whole point of woodworking is to increase your skill with making wooden projects. What better way to do this than to work on a project that you will use, and what project will you end up using more than a workbench? Not only are you liable to pay close attention to your techniques and craftsmanship, you are likely to learn a great deal about the craft itself along the way.
Conclusion
Whether you want the workbench to be just so or you simply want to make sure that it is exceptionally high-quality, there are plenty of reasons to build your own workbench instead of buying a prefabricated one. On top of the quality and customization, the price of making your own workbench is often less or similar to one that you would purchase.
One thing to remember is that you should build the bench for the woodworker you hope to become not the woodworker that you currently are. Since a solid workbench can last you decades, make sure that the workbench is built for projects you hope to build a decade from now or longer. The best way of doing this is by acquiring a solid set of workbench plans–remember, you can always “improve” on them too.
James Niehaus
A BIG THANKS to Jim at Perfect Cuts and Miters for offering this guest post for the Jack Bench blog page!
Why I Designed this Workbench:
I had a few problems with my first workbench. It was too low for carving or for detail work, it was too high for assembly, it was also too high to sit behind my table saw, and it was difficult to move around. It was anything but ergonomic!
After some thought, I concluded that an Adjustable Height Workbench could solve all of these problems. I then searched the internet to find one. The only option I found was unacceptable to me because it was slow and difficult to actually adjust the height. I decided to design and build one myself, and so my journey began.
The first thing I did was to set some criteria, things that this new bench must have to make it worth the effort. Here is what I came up with:
- First and foremost, it must be a REAL workbench. I wanted an end vise, dog holes, and a nice quick release face vise.
- It would have to have at least 12″ of height adjustability to make it worthwhile.
- It had to be as solid as possible. I would no longer tolerate a bench that moved around while I was working
- It had to be EASY TO USE! I know myself enough to know that if it took more than a few seconds to adjust the height that I would just continue to work in an awkward position until my back gave out. Others might say it’s because I am too lazy, I prefer to think of it as efficient, as in “I can’t waste the time…”.
- It had to be mobile. My shop is small and I have to be able to move things around. And, moving it had to be easy! (see above about laziness, er, efficiency)
The Workbench Design
I had no idea what the bench would look like, but I was determined to meet all of my criteria. I gave this a LOT of thought, in fact, I couldn’t stop thinking about it. My mind went from one idea to another and it kept me up at night, literally. I researched workbenches, I read books and asked other woodworkers what they thought the perfect workbench would look like.
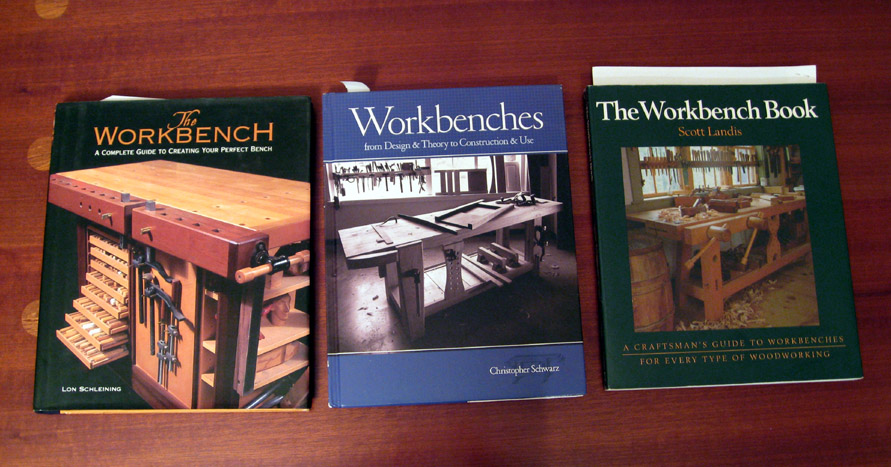
I read books by Scott Landis, Lon Schelling, and Christopher Schwarz. Chris Schwarz’s book is quite good, but it had too narrow of a focus for what I wanted. The Lon Schelling and Scott Landis books are quite similar, but my favorite of the three was The Workbench Book by Scott Landis. The reason I liked this one the best is because he was not stuck on any one particular design. He did not try to say that any one work bench design was best for everyone. What he did instead was to show all sorts of different workbenches and explain their benefits.
After all the research and all the time working on it I finally got a design in my head, but I had to make a cardboard model to see how it would actually go together.
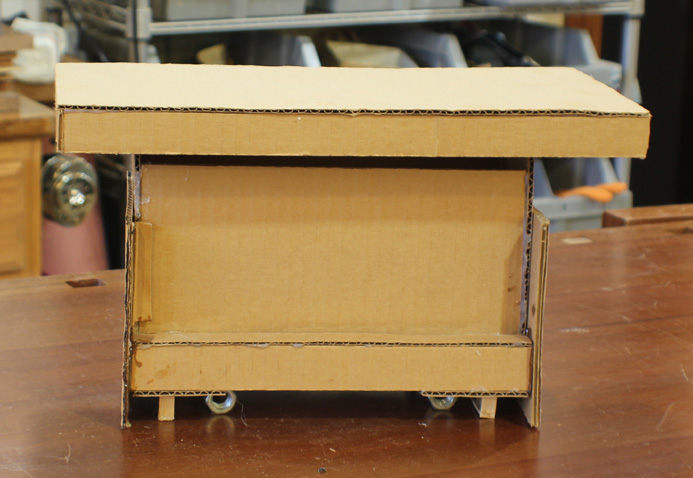
Cardboard Workbench Model
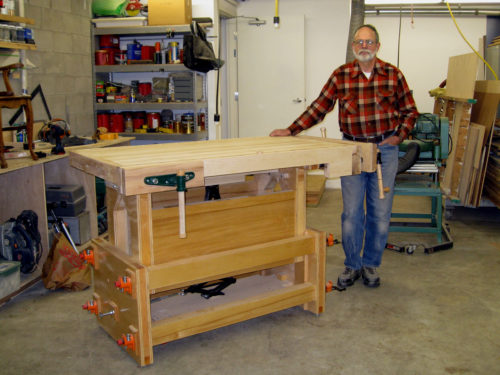
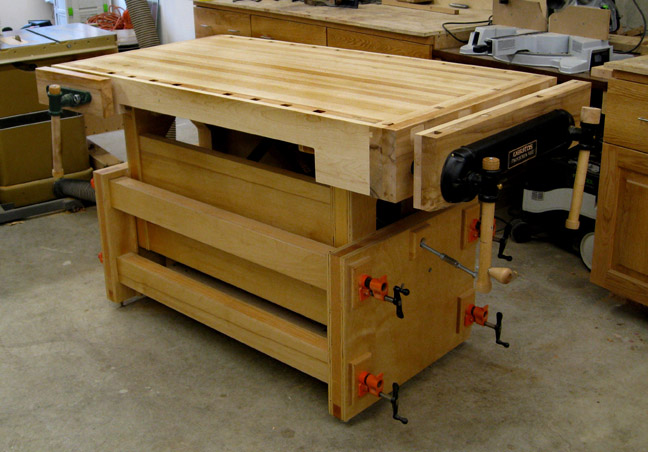
I worked with the model and developed the design until it perfectly met all of my criteria; solid, functional, mobile, ergonomic, easy to operate, and plenty of adjust-ability! What I came up with is a bench with rectangular legs that slid past each other. Some people would describe the legs as “telescoping”. These two sets of legs are held in place with some ordinary pipe clamps. I simply loosen the clamps and adjust the jack to change the bench height. When the bench top is where I want it, I snug up the clamps and the bench is as solid as a rock!
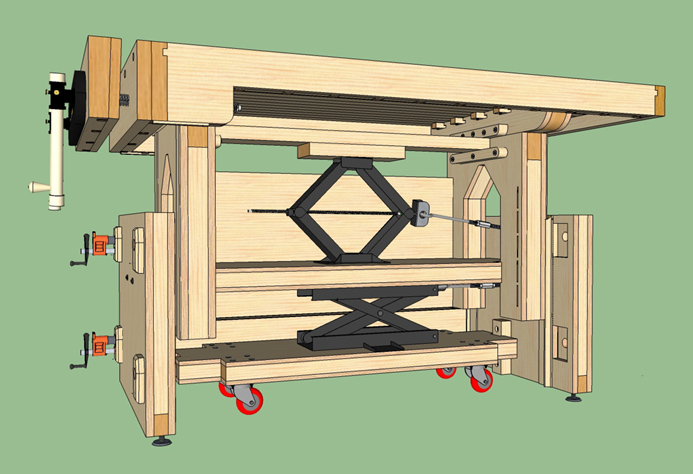
Bench Drawing with Parts Removed for Clarity
You will notice in the drawing above that there are two scissors jacks. The primary jack adjusts the height of the bench top and the other one lifts the entire bench up on to a cart that is nested below the bench.
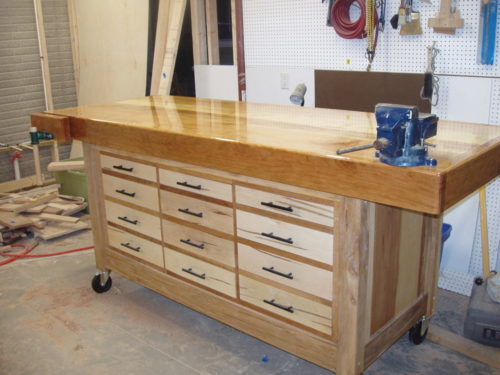
Actually, if you look closely you will notice that the design in the drawings is slightly different than the design of the bench in the photo. The difference is that the first design, the one in the photo above, has one stretcher and the upper set of pipe clamps go through the inside of the base. On the second, improved design, there are four stretchers and the pipe clamps are concealed inside of them. The revised design is much easier to build than the original one.
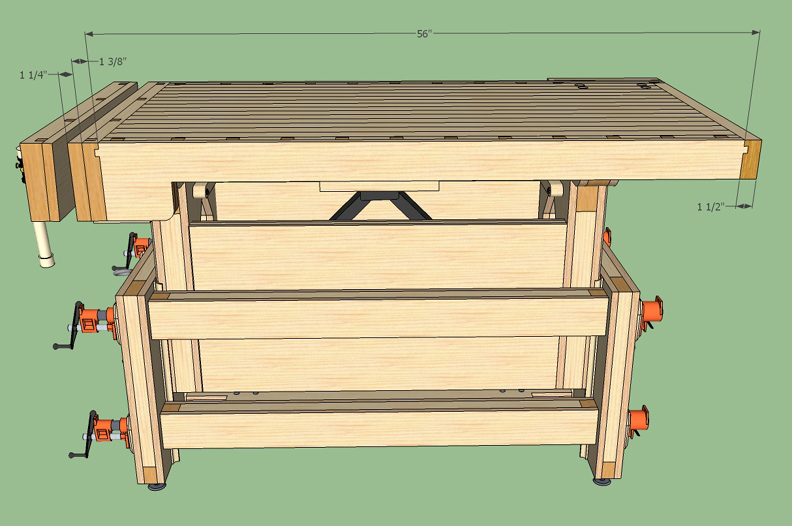
Sketchup Drawing of Jack Bench
The bench top includes everything I wanted, a quick release face vise, bench dogs, and a twin screw vise that doubles as an end vise for the bench dogs.
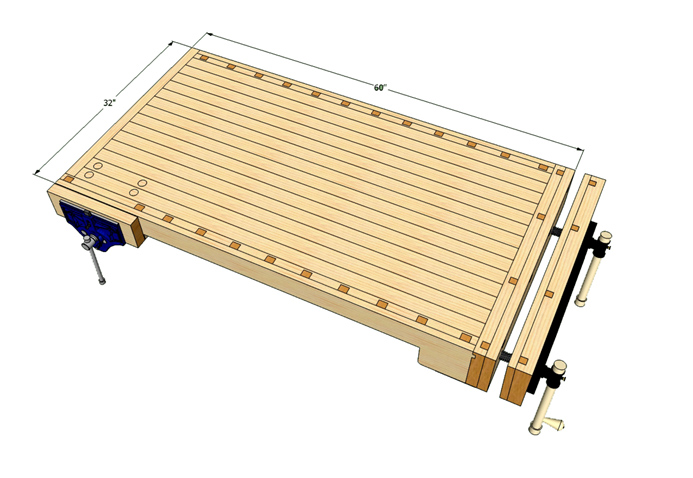
Bench Top Overview
I am thrilled with how the design turned out! I am proud to say that over a thousand people have purchased plans for the Jack Bench since I first designed it. Following are a few photos of benches that others have built from my plans.
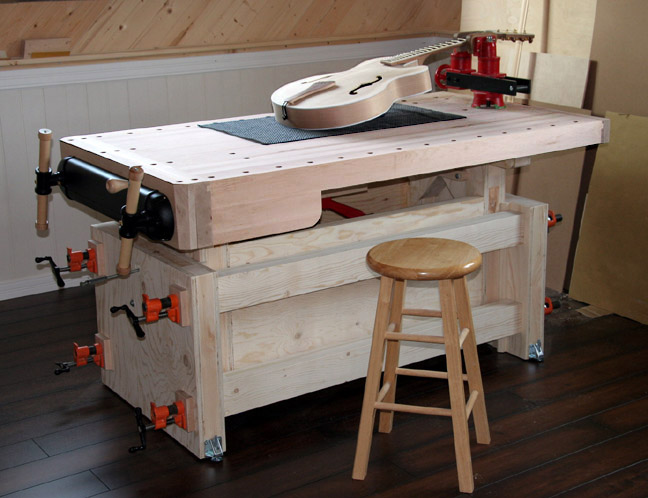
Jack Bench that Serge Lachapelle built from a set of my workbench plans
David Root’s Adjustable Height Workbench
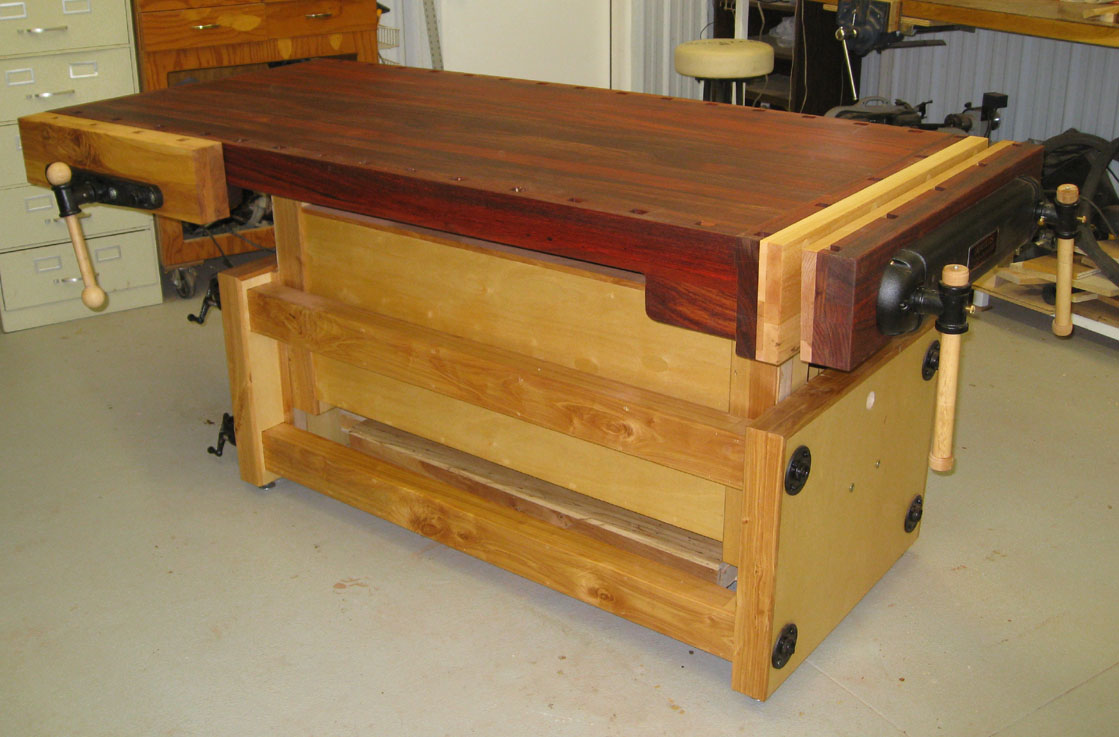
Kevin’s Adjustable Height Workbench
You can see many more examples of benches that others have built from my plans at my photo gallery.
I have a very nice woodworking workbench. My bench is adjustable height, has a built in mobile base, bench dogs, a twin screw vise on one end and a quick acting face vise on the other end. It is a fantastic bench for woodworking, which is most of what I do in my shop. I do like metal working, but I focus on woodworking. Occasionally, I need to use a metal vise and I discovered a great, and very easy, solution.
I have two metal vises. I keep the better one in the garage and I have a smaller one that I keep downstairs in my woodshop.
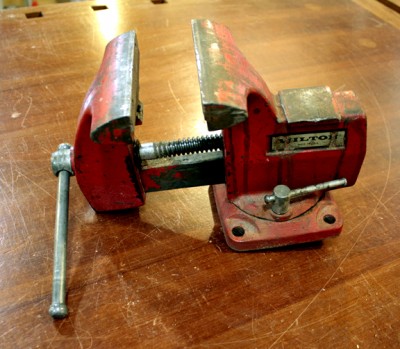
My old Wilton metal vise
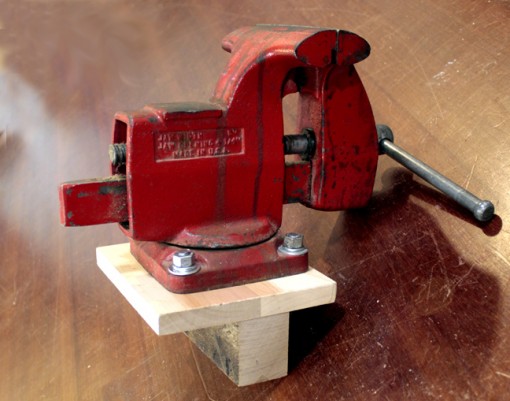
This is a really quick and easy tip. I just bolt a tee shaped block on to the bottom of the metal vise. On those occasions when I need a metal vise I drop it into one of the vises on my woodworking workbench, tighten it down and I am ready to go!
The block is made up of a small wooden “plate” with holes that correspond to the mounting holes in the vise. I glued another block on to the plate that can be clamped into the vise on my bench.
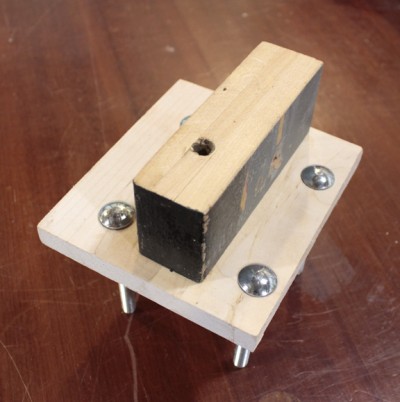
Tee shaped mounting block is bolted on to bottom of metal vise
Notice that I use carriage bolts to connect the plate to the bottom of the vise. I often use carriage bolts on wood because once I pound them into the wood they will lock in place. This means that I don’t need two wrenches to tighten the bolt. The heads on the carriage bolts also give a much more finished appearance than regular hex heads.
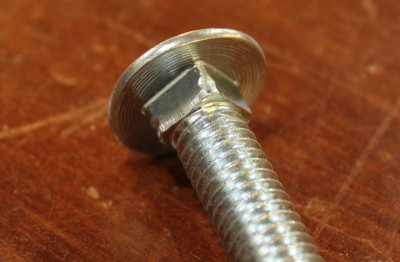
Carriage bolts have a square section just under the head

You can create a recess in wood by tapping the carriage bolt with a hammer

Then the carriage bolt will fit snugly into that recess

Carriage bolts have a very finished look when they are flush with the surface
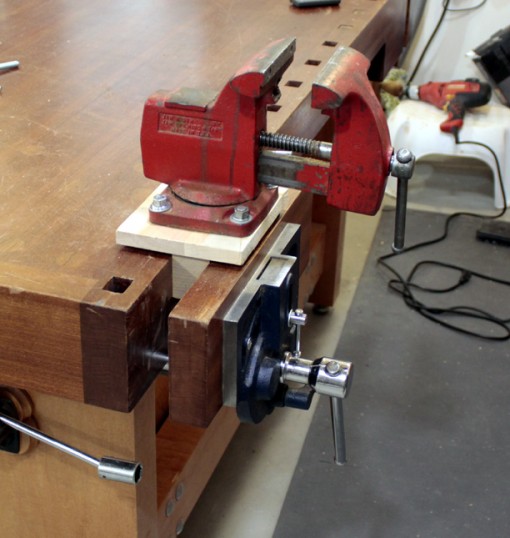
Metal Vise ready to install on Woodworking Workbench
I normally store the metal vise someplace out of the way. When I need to use it I just pull it out, drop it into my face vise, tighten it down, and I am ready for metalworking!
Metal vise temporarily installed on Woodworking Workbench
This is how the vise “might” look when I am actually using it!
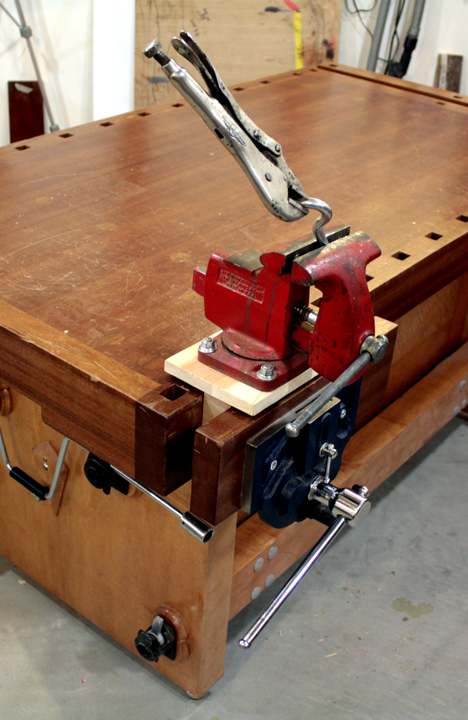
Fun with vises on my workbench!
I have to thank my friend Al Frank for giving me the idea for this. I don’t know if it was his original idea or if he “borrowed” it from someone else, but I really like it. I hope you like it, too!
Please be sure to check out my other blog articles and for sure leave a comment. I would love hear about how you approach this issue in your shop!
Thanks!
Charlie
I know many YouTubers do regularly scheduled updates on their channels. I can’t commit to regularly scheduled updates at this time. I think later this year I am likely to begin some kind of regular update, but I am just not ready for that yet.
Fast Acting Twin Screw Vise
My friend, Andy Klein, asked me to help him with the prototype on a fast acting twin screw vise that he designed. I spoke before about this, but it certainly is one of the bigger things that I have been working on. For a variety of reasons, Andy was not able to work on the prototype for the vise. I ordered material from an online supply house, fabricated the parts, welded them together, and assembled the completed prototype. Along the way, Andy and I worked together to refine the design. This was a lot of fun!
Four Way Parallel Clamps
Before the vise was even completed, Andy presented another new design to me. This one was for some four way parallel clamps. The clamps were another very fun project that I recently worked on.
Jack Bench: Series of Interviews for YouTube
When the projects with Andy started to slow down I decided that I would conduct a series of interviews for my YouTube channel. My idea is to conduct face to face interviews with prominent woodworkers. Many of the people I will interview are well known on YouTube and on the internet, but there are some fabulous craftsmen, wood artists, and makers without a strong internet presence. I am interested in meeting anyone with an interesting story whether they have an internet presence or not.
I interviewed George Vondriska of the Woodworkers’ Guild of America. Actually, I did 3 interviews and a shop tour with George. George also discussed workbenches. As it turns out, George likes Adjustable Height Workbenches. He likes them so much that he has not one, not two, but three of them in his shop!
I also interviewed Tom Caspar. Tom works in a fabulous shop and we did a video tour of his shop. Unfortunately, my el-cheapo microphones failed and I was unable to salvage any of the footage from the shop tour with Tom. Hopefully, he will be nice enough to give me another chance.
Last week I interviewed Matt Cremona. Matt is involved in a really exciting project with the Wood Whisperer, Marc Spagnuolo. Matt is conducting an on-line woodworking class for the Wood Whisperer’s Guild. I also got to see some of the cool things in Matt’s shop. Among the coolest was a 16″ circular saw! The best part was the Matt let me use it, that was fun!
Going forward, I have commitments for interviews from Zac Higgins at NV Woodworks, Ray at TabLeft Woodworks, Matthew Morris at MM Wood Studio, and from my friend Andy Klein. There are several others who I plan to interview, but I don’t want to say more about them until I actually schedule the meetings.
Adjustable Height Workbench
 Hello and welcome to the new Jack Bench website. I am very excited to introduce the new website and the changes that have been made. I hope this can be a place that can fuel discussion amongst wood workers and generate ideas. And I will be posting weekly blogs to help facilitate this conversation. So, I think we should get to it, the exciting news:
The plans for the ergonomic, movable, and adjustable height Jack Bench can now be obtained through digital download! This allows you to get to work immediately, rather than waiting a couple days for them to arrive via mail. This is a great option for younger woodworkers who utilize a tablet. Of course, for those who still like large, physical copies of the plans, ones that they can hold in their hands, the plans can still be purchased through regular mail. Both options have their own benefits, and it really depends on your personal preference which one you want.
Hard Copy Workbench Plans
The physical plans are great because they are printed on 11×17 paper and this large format enables woodworkers to get an up close and personal look at the plans. They can also be filed away and pulled out years later should you want to build the bench again. These plans are probably the best option for people who still like to read an actual newspaper, instead of dealing with the internet.
Digital Download Workbench Plans
This is a good option for people who use tablet computers in their workshop. People who choose this option could print the plans, however they would be either condensed or split up as standard home printers use 8.5”x11” paper and the plans that I sell come on 11”x17” paper. Although, when you use the plans on a tablet computer, you can zoom in and get close looks at the plans, just like you could with the hard copy plans. Really, it all depends on your personal preference and if you mind waiting a couple days for the plans or you want them immediately.
DIY Workbench Plans & More
With the new Jack Bench website, not only will I continue to offer plans for the adjustable height workbench, but other plans will be offered too. Right now plans are being drawn up for a jewelry box with a locking mechanism and those will be offered shortly. And more plans will be coming too. So remember to check back here often as I will always be adding to and updating the site. Also, if any of you have recently built a Jack Bench, I would love to see pictures of it. Always curious to see others’ creations. Until next time, Charlie Kocourek.