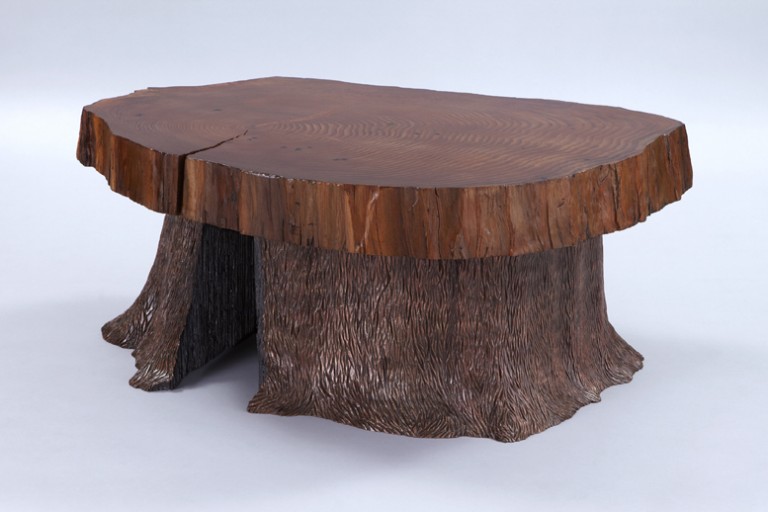
A few months ago I made a slab coffee table. It was quite an undertaking and I have 4 other articles on this woodworking project. This video is an overview of the entire build process! This video also includes how I did the copper finish on the base and a bit on how I finished the top of the slab. This article is primarily about how I applied the copper finish on the coopered wooden base.
Before I talk about the finish, let me tell you about the other 4 parts of this build!
I tried just filling them with epoxy, but it didn’t look right. (I screwed up) Then, in order to cover the epoxy, I decided to inlay stars in those spots.
OK! Now let me tell you about the faux copper finish!
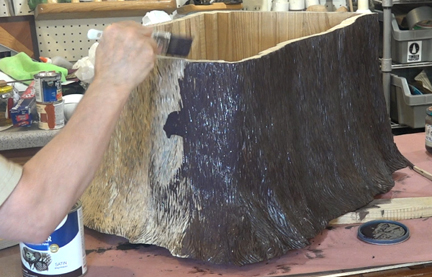
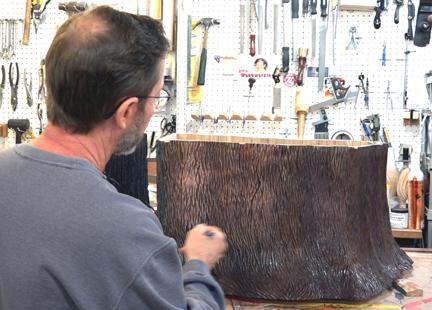
Initially, I wanted the base to have a bronze finish. This was an easy 2 step process. First I applied a base coat of brown, then I dry brushed a high-quality bronze paint across the top of the texturing.
Applying the brown base coat
Completed Bronze Finish
When I was done the base looked exactly the way I had envisioned. It really looked like a piece of bronze! But, when I set the top onto my beautiful bronze table base there was a big problem. The base had a very green tone and the top had a very red tone. While each of them looked great by itself, they looked terrible when they were together!
The greenish bronze base looked wrong with the reddish slab top
So, being the perfectionist that I am, I brushed another coat of the brown base color over the top of the “bronze” and started over!
Applying 2nd coat of brown
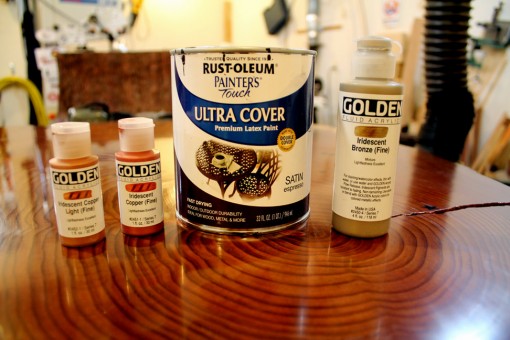
I had 4 different paints. First was the brown base coat, I found that I liked Rustoleum’s satin espresso color the best for this. For the metallic’s it was important to use only the highest quality and I chose “Golden” brand acrylics. The first one I used was an Iridescent Bronze. Then I had two copper colors, Iridescent Copper was more reddish and Iridescent Copper Light was more of a gold colored copper.
It is important to use high-quality paint
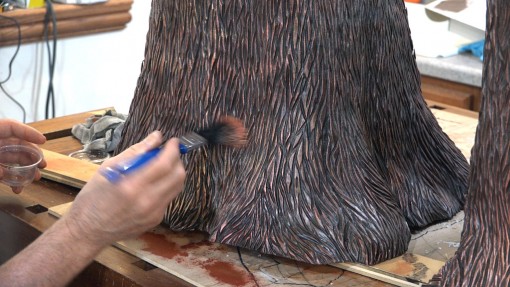
First I dry-brushed a coat of the more reddish colored copper paint.
Dry brushing the Red Copper color
But the more I applied the more apparent it was that the red was a bit too red. It seemed to have an artificial look to it.
A little bit too red!
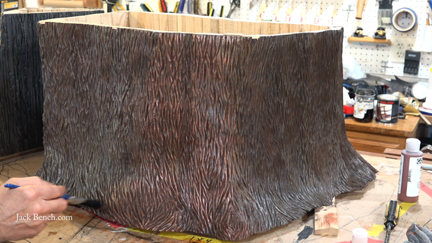
I was glad that I bought both copper colors. To “fix” the too red problem I dry brushed just the slightest bit of the more gold colored paint over the top of the red.
Close up of base after finish was complete
It is not as easy to see in the photos, but adding that little bit of the golden colored copper paint made a BIG difference!
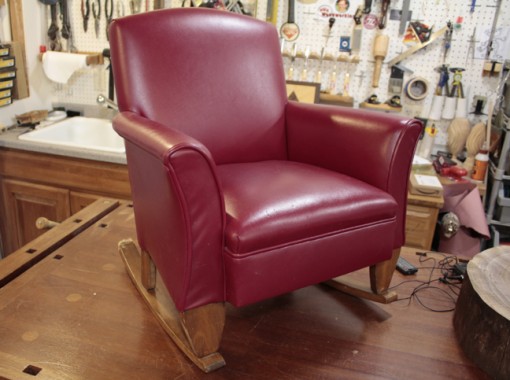
I was very happy with the final result!
Completed Table, compare this to how it looked with the bronze colored base!
Check out the accompanying articles about this table
https://jack-bench.com/wp-content/uploads/2016/10/Jack-Bench-Blog-Coffee-Table.jpg320400Charlie Kocourekhttps://jack-bench.com/wp-content/uploads/2016/10/Jack-Bench-Logo.pngCharlie Kocourek2016-10-20 15:47:132017-11-20 03:11:47Slab Coffee Table w/Carved Tree Trunk Base – Complete Build! 5 parts in 1!
After I made the first slab flattening video I realized there were a few things I could have done better. Making a similar video for WWGOA gave me an opportunity to make those changes.
I do my absolute best when I make my videos, I really do. But, when I do a video for the Woodworkers Guild of America I am working with George Vondriska and George reviews everything for me before it goes public. Basically, two sets of eyes are better than one!
I would love to hear your comparison between these two videos.
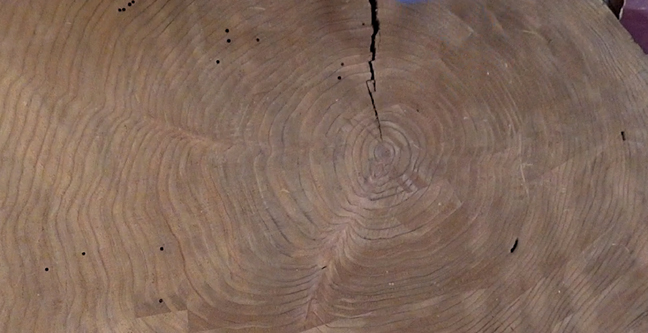
For the WWGOA flattening video I used a 16″ walnut “cookie” that I got from Matt Cremona. Now that the video is complete I have a 5″ thick slice of walnut that is nice and flat, but I don’t have a project for it. I think it would a pretty nice, but very rustic, end table and I hate to see it go to waste.
I am giving this slab away to the first person who asks for it! It could make a nice rustic table top.
So, I AM GOING TO GIVE THE WALNUT SLAB AWAY to anyone who has a use for it. First come first serve. I would rather not ship it across the country, but you can pick it up from me at my house in the Twin Cities. OR, I will bring it with me to Woodworking in America and give it to you while I I am in Cincinnati. Just send me an email to let me know that you want it: charlie@jack-bench.com
Zippy with the Cherry Bookcase that I built this week
What I have really been busy with this week is a bookcase. A friend of mine asked me to build one for her grandsons and I agreed. It took a while before she confirmed that she really did want it and just what she wanted it to look like. When I finally got the word, she needed it in 2-1/2 days! Consequently, this update video got pushed back a few days. I will have a video and an article on this project soon.
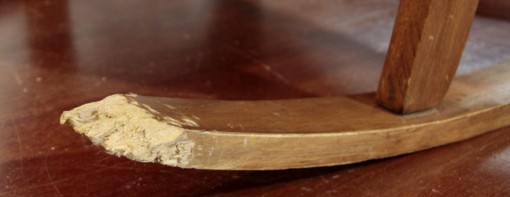
Child’s Rocking Chair
The dog chewed the end off of this rocker
Last week a friend of mine brought in a child’s rocking chair that the dog had chewed on and asked me to repair it for him. That will be one of my next projects.
My featured YouTube video this week is Kyle Toth’s Hall Table video. Actually, all of Kyle’s videos are great but I especially liked this one!
I hope to see you at Woodworking in America next week!!!!
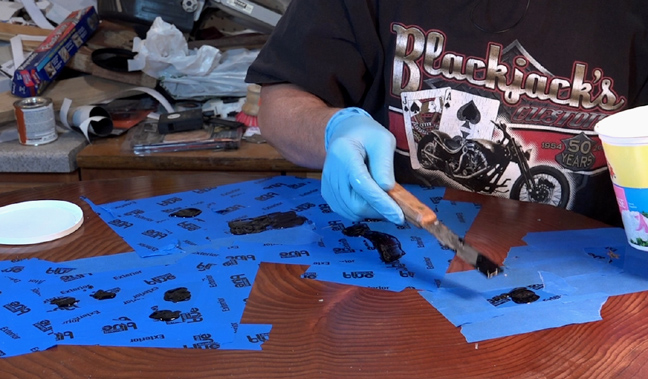
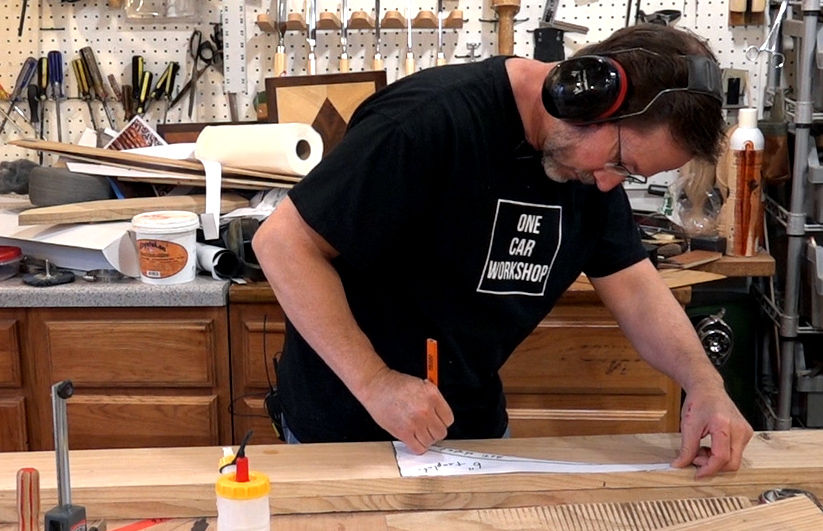
I inlaid decorative black stars in my slab coffee table. This is one of those times when the reason why might be more interesting as the how. The how is good, too but the WHY is a good story all by itself!
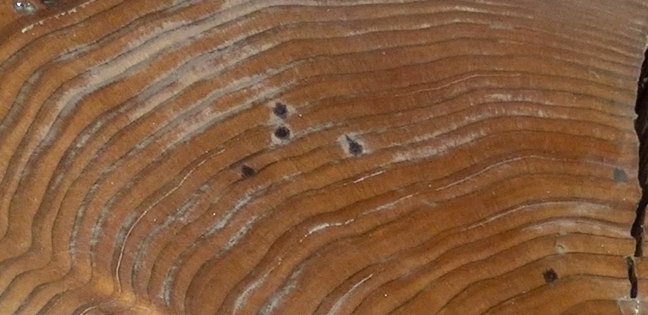
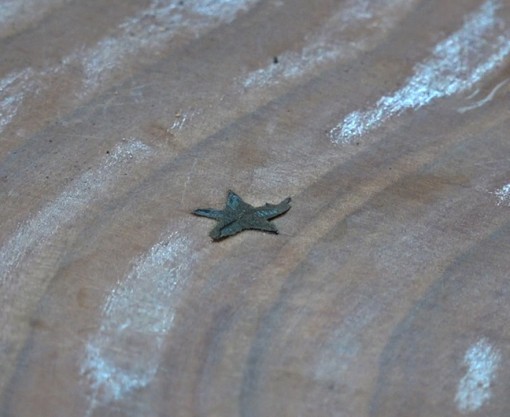
The wood slab that I used for the table had a lot of worm holes in it.
I wrestled with what to do with them. Leaving them just as they were would have been a perfectly good choice, but I couldn’t leave well enough alone. I decided to fill them with epoxy.
Unfortunately, what I didn’t consider is that the surface of the slab was end grain. As a result, the epoxy bled beyond the worm holes. Rather than the nice distinct little dots that I had envisioned, I ended up with a bunch of ugly little blobs.
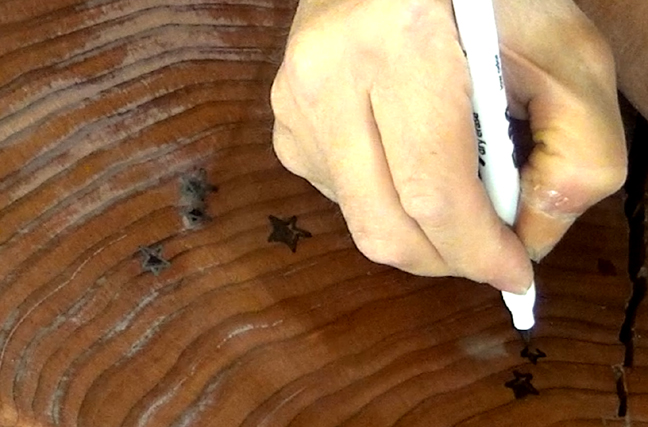
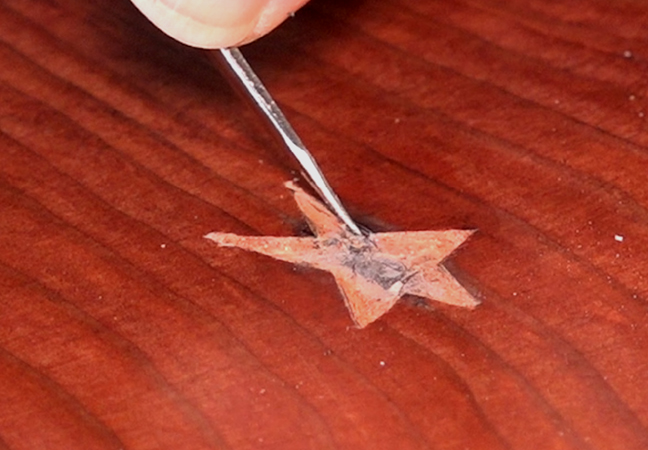
After thinking about it for a while I decided to disguise the, now blobs, by inlaying stars over them. I didn’t want the stars to look like I put them on with a stamp. So, to add interest I purposely drew the stars by hand to ensure that no two would be the same.
Then I scored around the edges with a small chisel and an Exacto knife.
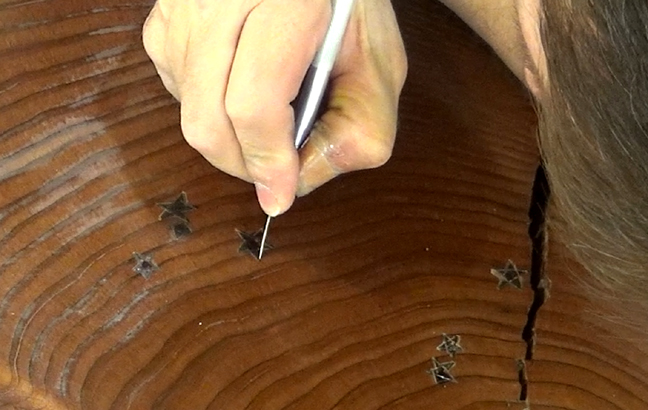
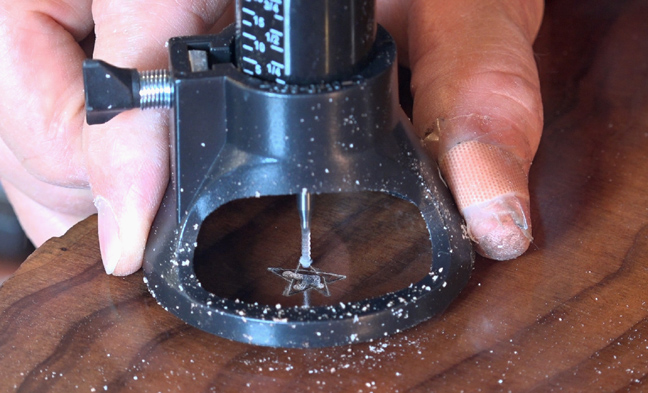
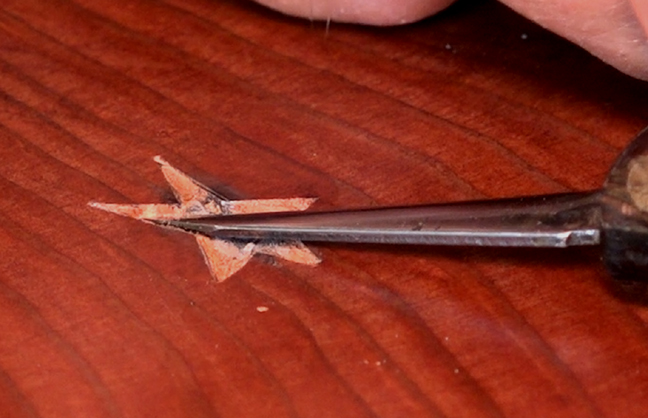
Once I outlined the edges, I excavated most of the waste with a Dremel tool.
A Dremel is perfect for inlay work. Unfortunately, the Dremel base that I had was not. The base that I used is called a “Cut-Out” base and it is more suited for cutting holes in drywall than it is for very fine detail work. The problem is that it is difficult to make fine, or repeatable, depth adjustments. As a result, the excavations were a bit deeper than I would have liked. No biggie, but I would rather have used a higher quality base.
I used a small chisel and a detail knife to clean up the star recesses after roughing them out with the Dremel.
The detail knife was absolutely perfect for this task! The one that I use is similar to, but not exactly like the one in the link.
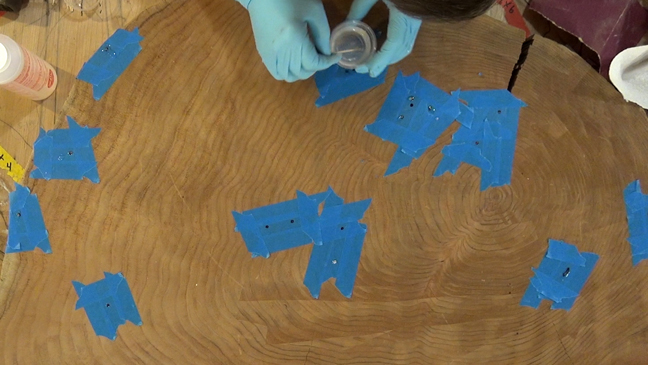
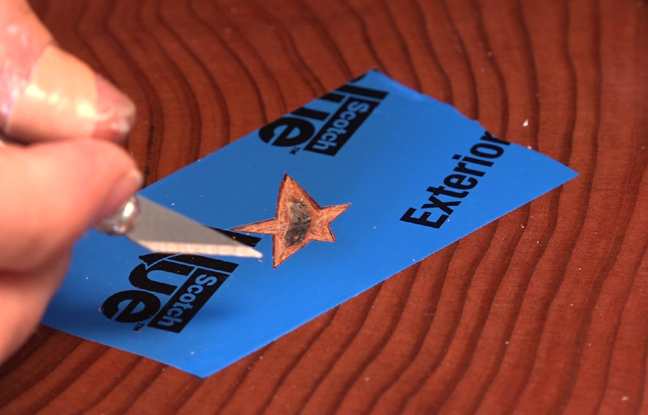
I masked the stars off with some really high-quality masking tape. It worked well for this job, but after reading the reviews I am not sure if it was the “best” product for the job.
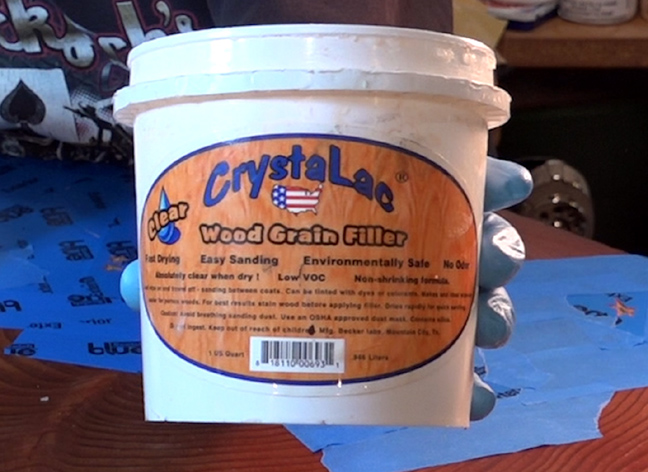
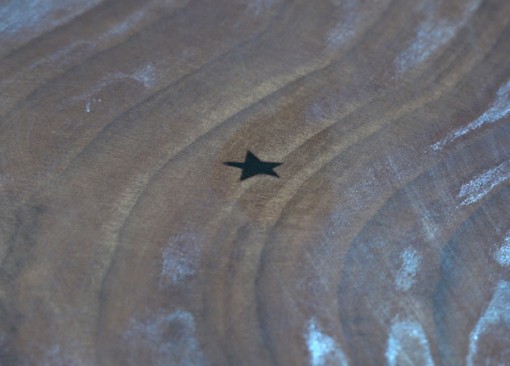
I was a little leery off epoxy after the problems I just had with it so I decided to use something different. I have had very good luck with a water based grain filler called Crystalac, so I decided to use that instead.
I used regular Rit dye that I bought at the grocery store to dye the Crystalac and it worked great!
Adding Crystalac to the star recesses
Crystalac works great for filling grain, but it is not intended for filling these relatively large recesses. The downside was that it tended to shrink back and I had to apply multiple layers to bring it level with the surface.
This is how the stars looked like when I removed the masking tape.
The good thing about the Crystalac is that is was very easy to sand down.
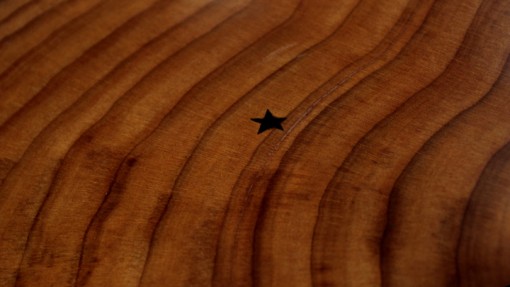
I am very happy with how they turned out. The end result was not only good, but it turned out to be a real conversation starter!
Please check out my other articles on the Slab Coffee Table:
I hope you liked my article and I would greatly appreciate it if you would leave a comment to let me know what you think of it!
NOTE: I provide very honest assessments of the tools and materials I use in my projects, but I want you to know that many of the links on this page are affiliate links and will earn Jack Bench Woodworking a small commission. Using these links adds NO COST TO YOU, but helps keep Jack Bench sustainable and ensures that I can continue to offer woodworking videos and articles. Thank You!
https://jack-bench.com/wp-content/uploads/2016/08/Jack-Bench-Star.jpg320400Charlie Kocourekhttps://jack-bench.com/wp-content/uploads/2016/10/Jack-Bench-Logo.pngCharlie Kocourek2016-08-11 22:48:442017-11-20 03:20:47How and Why I Inlaid Decorative Stars in my Slab Coffee Table
In my last article, I showed how I constructed the two pieces that make up the base for my slab coffee table. In this article I will show the steps I took to get them from rough shells into two sculpted and fully textured furniture parts that are ready for finishing. There were some real surprises with the tools. I will also tell you which tools worked well AND which tools did not work out so well!
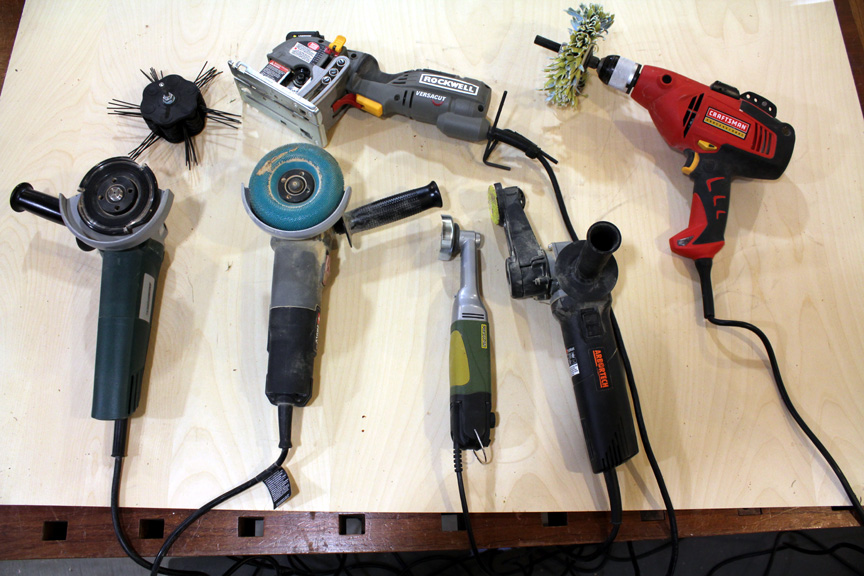
Carving tools I used, or at least tried to use, on this project
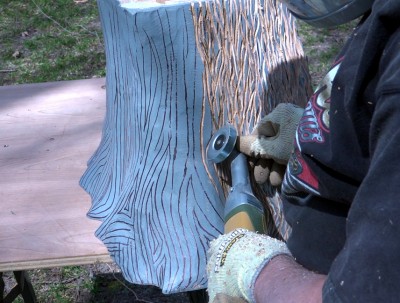
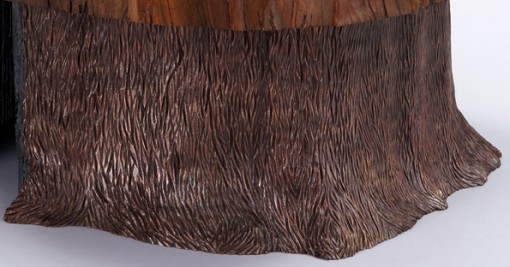
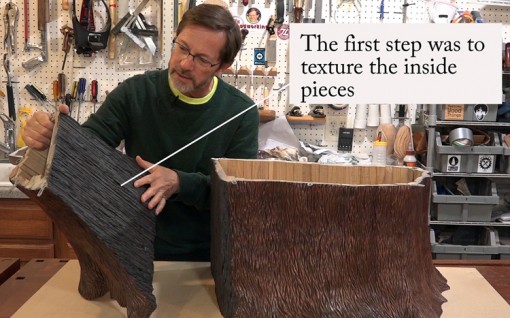
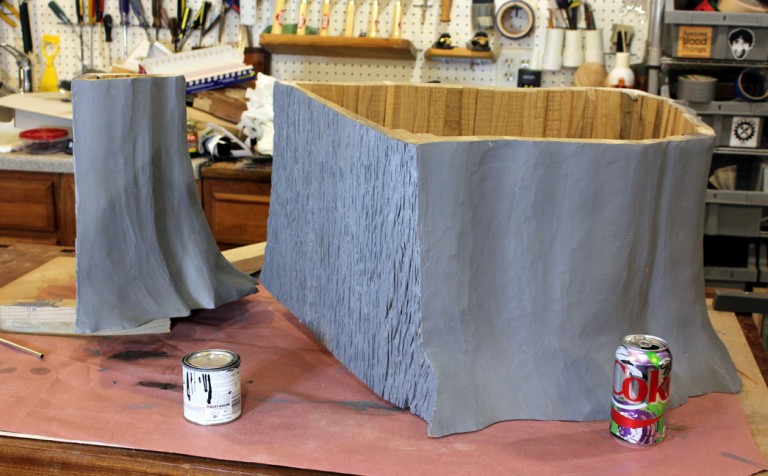
There are actually two different textures on each of the base pieces. As I said in the article about constructing the base pieces, Constructing a coopered tree trunk , I intended it to look like a tree trunk that had split in half. I wanted the texture on the inside faces to look like rough, weathered wood. I textured the inside pieces prior to assembly, but I wanted to show all of the texturing in a single blog article.
Adding a Rough “Weathered Wood” Texture to the Inside Faces
Rough weathered texture on inside faces
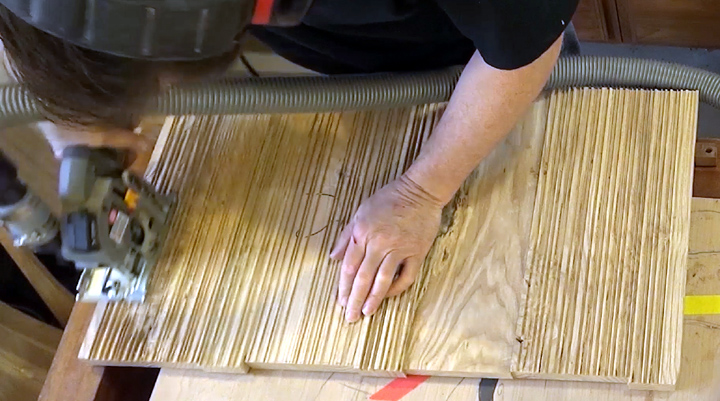
To get the weathered wood texture I began by cutting a bunch of lines in the wood. I did some of this on the table saw and I did some of it with a 3″ circular saw. Why a 3″ saw for this? Only because it was handy!
I especially like that it can be used as a plunge saw. I had to use an adapter to hook it up to my vacuum, but once I did the dust collection was excellent. After the lines were cut I used that circular saw to get the texture. This is the part that really sold me on this saw. The way I used it for texturing was to keep plunging the saw into the wood at different angles.
Sculpting the Pieces into Shape to Prepare for Texturing
I intended for the texture on the outside faces of the base pieces to be sort of a stylized texture. I really didn’t care if the texture on the outside looked exactly like tree bark. Maybe it would look like tree bark and maybe it wouldn’t. My only goal was for it to look good.
The two pieces had been glued up, but the surfaces were very rough. I had to smooth out the roughness and sculpt them into their final shape before I could start texturing.
Base before sculpting
The larger base piece (above) wasn’t too bad, but the smaller piece (below) was really rough before I started sculpting it!
The small base piece was especially rough before sculpting
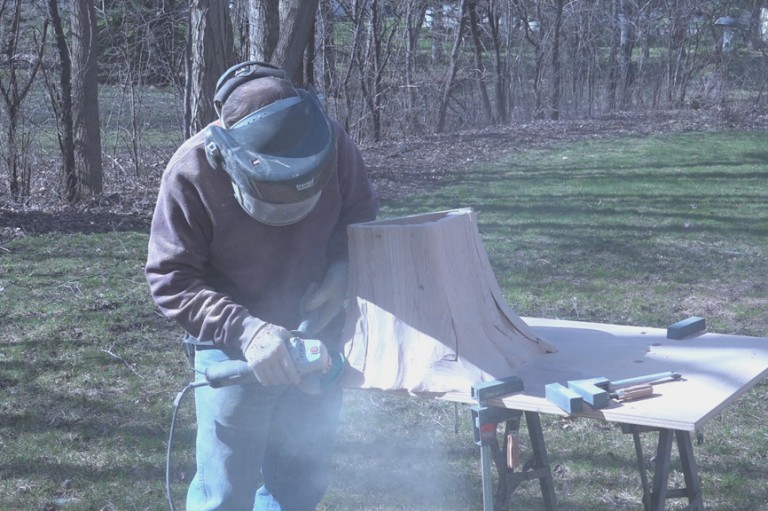
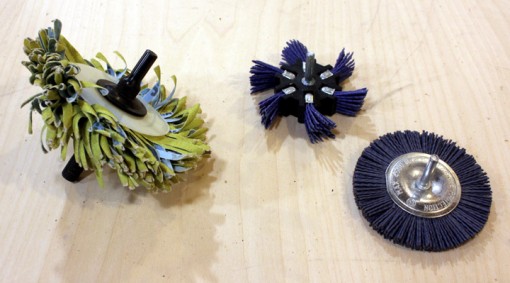
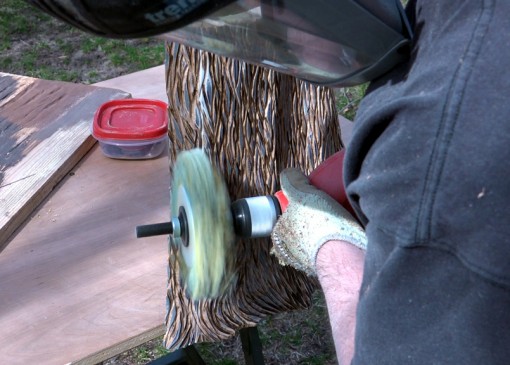
I used a 4-1/2″ angle grinder for the sculpting. At first, I tried sculpting with a 4-1/2″ Arbortech carving wheel. This wheel has three carbide teeth and it cuts like crazy! However, it was very hard to control and to tell the truth it was kind of scary to use!
Arbortech 4-1/2″ Carbide Cutter
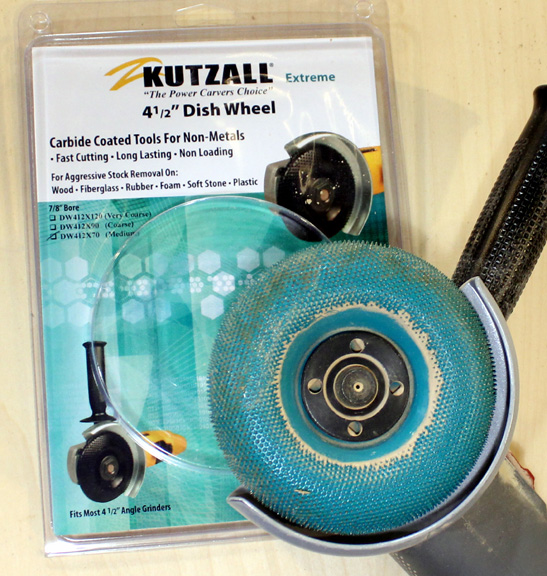
After trying the Arbortech I bought a Kutzall carbide coated carving wheel. This wheel is covered with sharp little nubs. The Kutzall was easy to control and it worked GREAT! These are available in different grits. I had no problems with the medium grit.Kutzall Extreme Carving Disc – Medium, Tungsten Carbide Coating – 4-1/2″
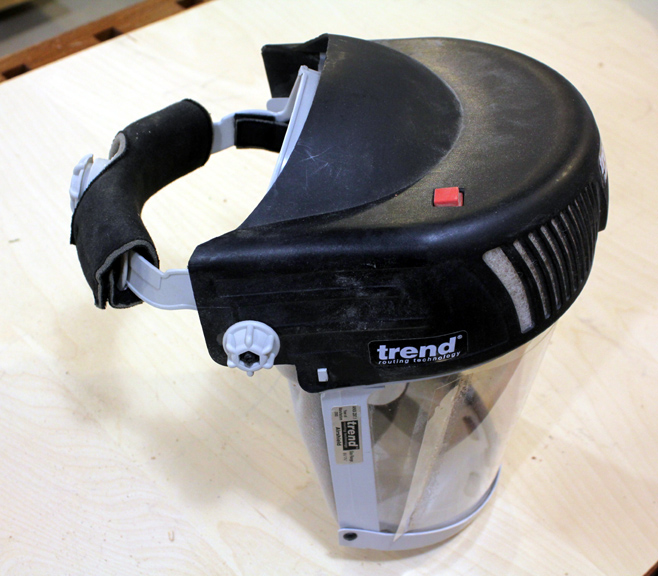
One thing about carving with an angle grinder is that it produces a LOT of dust! I have had a Trend Airshield for several years. It has a small battery powered fan that draws air through a filter and then directs the filtered air on to your face. Besides keeping the dust out of my eyes and my lungs the air from the fan helped to keep me cool. Honestly, I don’t use it very often, but it was perfect for this job. TREND Airshield – Powered Face Shield
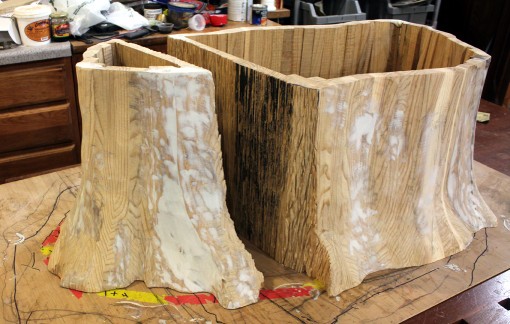
Small base piece needed a lot of fill before I could start texturing.
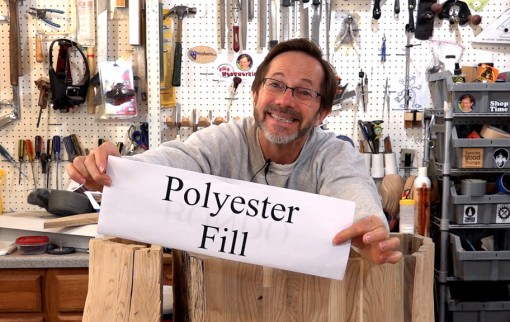
The small base piece looks pretty bad, but I had anticipated this and was not at all concerned. Regular automotive body filler, Bondo, is great for wood, too! I don’t use it much though because it doesn’t look like wood. In this case, I planned to use a painted finish so this was a great choice. If your clients knew you were using Bondo it would leave a bad impression. So, be sure to call it “Polyester Fill” if it ever comes up in conversation!
This is my secret weapon!
If you have clients then don’t call it Bondo! Always call it “Polyester Fill”
Bondo is tough, non-shrinking, and very easy to work with. You can buy it at Home Depot and at just about any automotive part store. It is a thin two-part paste-like material. You just trowel some out onto a piece of scrap wood and mix in a bit of hardener. Then use a rubber spreader and immediately add it where needed. After a very short time it will start to firm up. As soon as it does take a grater type of tool or a rasp if you don’t have a grater and trim it down to where you want it. I used a Microplane to trim off the excess bondo. It is very important to trim the excess before it hardens completely because his stuff sets up as hard as a rock.
Base pieces after fill and smoothing with polyester fill material
Texturing the Base Pieces
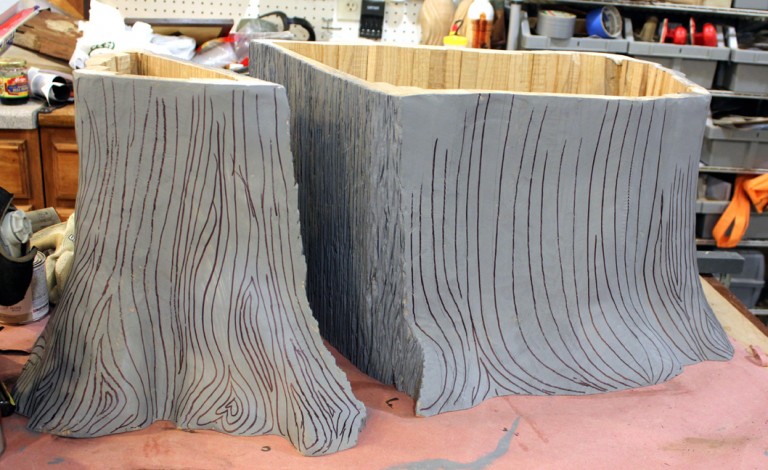
Sometimes it is difficult to see your progress when power carving. So, before I actually started cutting in the texture I painted everything grey to make it easier to see what I was doing.
I painted the base pieces to make it easier to see my progress while texturing.
I needed some kind of a guide to keep me on track while I was cutting the texture. It is a lot easier to change a line drawn on the surface with a marker than it is to change a line that is cut into the surface with a grinder. I used a laundry marker to lay out the lines before I started texturing.
I drew lines as a guide before I started cutting
You can see by the lines on the small base piece what I meant when I said that I was going for a stylized texture.
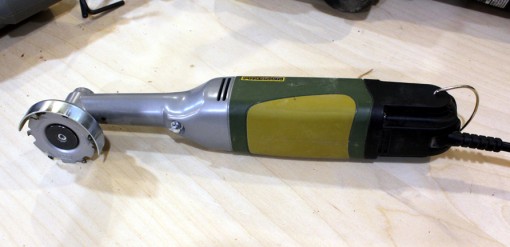
What I did use was a little Proxxon angle grinder that I borrowed from a friend. Proxxon 38544 Longneck Angle Grinder LHW/E
The Proxxon was great for the detail work that I doing. I must say, though, that this one has its own set of problems. The on/off switch is a rocker style switch and a few times I accidentally shut it off while I was using it. This isn’t such a big deal, but if I can accidentally shut it off then it stands to reason that I could accidentally turn it on, too. Like I said, I borrowed this from a friend of mine and I don’t know how much use it had seen. This particular grinder sounded like the bearings were wearing out. The bottom line is that it was just right for the task at hand. If I ever have a similar project then I will probably buy one for myself.
After I was done texturing I sanded everything down with a 120 grit mop sander. I tried buying some of the $6 drill mounted sanders that you see in the hardware stores, and I am being generous when I say that they weren’t that good. There are several places to buy sanding mops and you can even make your own. The one that I used was from Stockroom Supply: http://stockroomsupply.ca/shop/sanding-mops/6inmop80-319.html
I tried all 3 of these drill mounted sanders. Guess which one was best.
I used a 6″ Sanding Mop to clean everything up after texturing
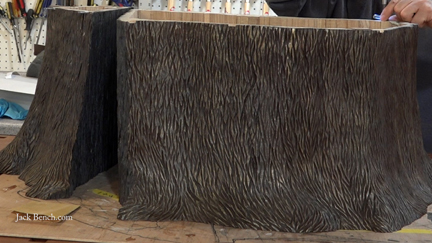
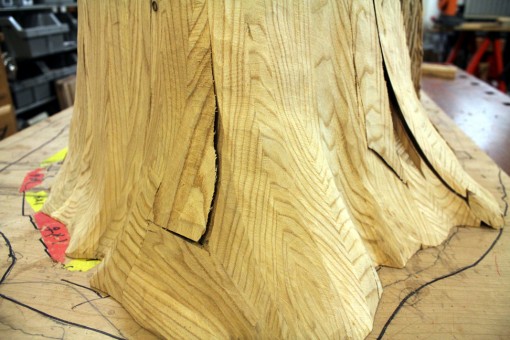
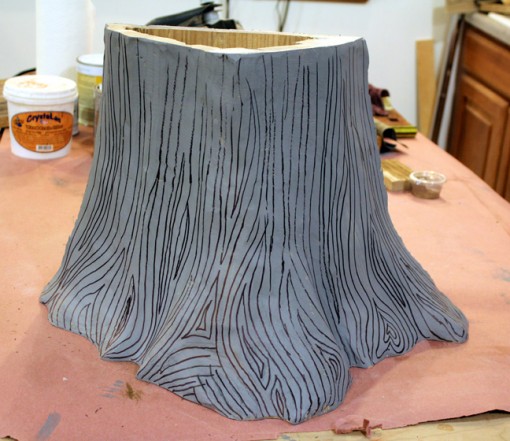
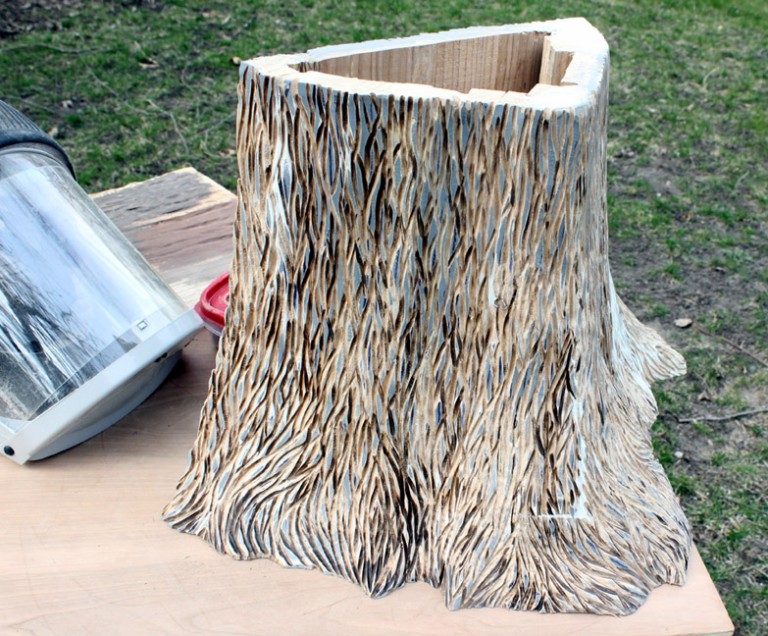
Here is how the small base piece looked immediately after I was done with the texturing. I am quite happy with the final result!
Small base piece after sculpting and texturing
In the next article on the Slab Coffee Table, I will show you how easy it is to add a metallic finish!
You will be surprised how easy it is to add a metallic finish.
I hope you liked my article and I would greatly appreciate it if you would leave a comment to let me know what you think of it!
NOTE: I provide very honest assessments of the tools I used in this project, but I want you to know that many of the links on this page are affiliate links and will earn Jack Bench Woodworking a small commission. Using these links adds NO COST TO YOU, but helps keep Jack Bench sustainable and ensures that I can continue to offer woodworking videos and articles. Thank You!
https://jack-bench.com/wp-content/uploads/2016/05/Jack-Bench-Blog-Trunk.jpg320400Charlie Kocourekhttps://jack-bench.com/wp-content/uploads/2016/10/Jack-Bench-Logo.pngCharlie Kocourek2016-05-27 23:02:212017-11-20 03:24:11How I Carved and Textured the “Tree Trunk” Table Base
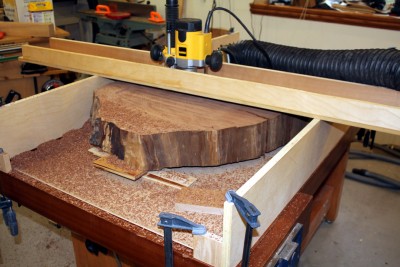
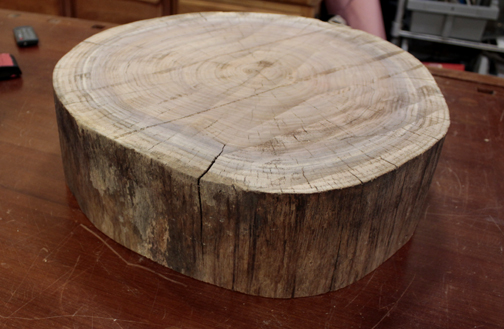
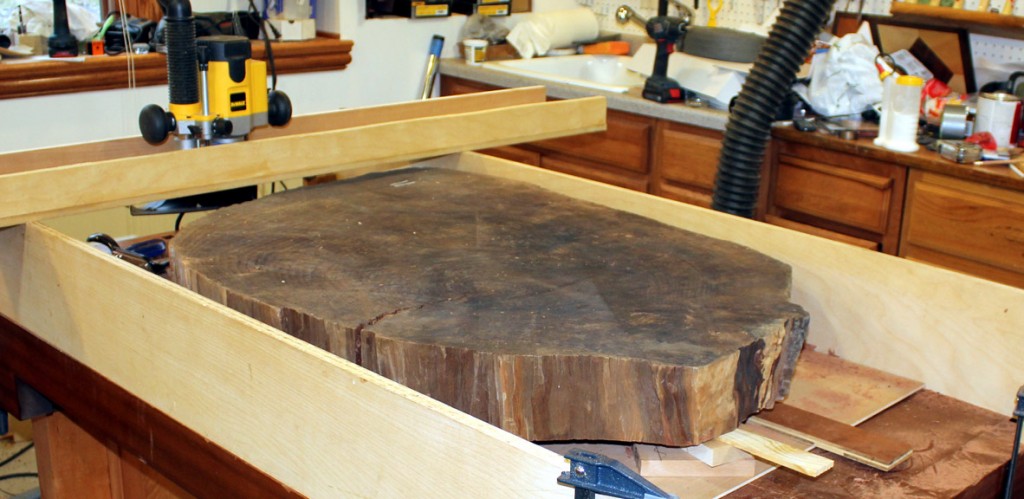
I have a very nice walnut slab that I plan to make into a coffee table. I flattened this slab right on my workbench! I am happy to say that flattening a slab of wood with a router was even easier that I thought it would be! Not only was it easy, but the results were great! This is one of those tasks where an adjustable height workbench came in very handy because setting it to a very low height made it easier to reach across when moving the router across the slab.
Walnut slab right before flattening
The slab is a slice out of a tree, some people call this a “cookie”. The dimensions are 26″x38″ and it started out 4-1/2″ thick on one end and 5-1/2″ thick on the other end. I like that it is thicker on one end that the other, I think it will add to the rustic look of the slab coffee table. Keeping it thicker on one end probably made the flattening process easier because I didn’t have to remove as much wood as I would have to make the faces parallel to each other.
The essential steps in flattening a slab with a router are simple:
• Level the top surface of the slab
• Place guide runners on two sides of the slab
• Move a router on a sled back and forth across the runners to flatten the slab
Following is a more detailed explanation!
Level the top surface of the slab
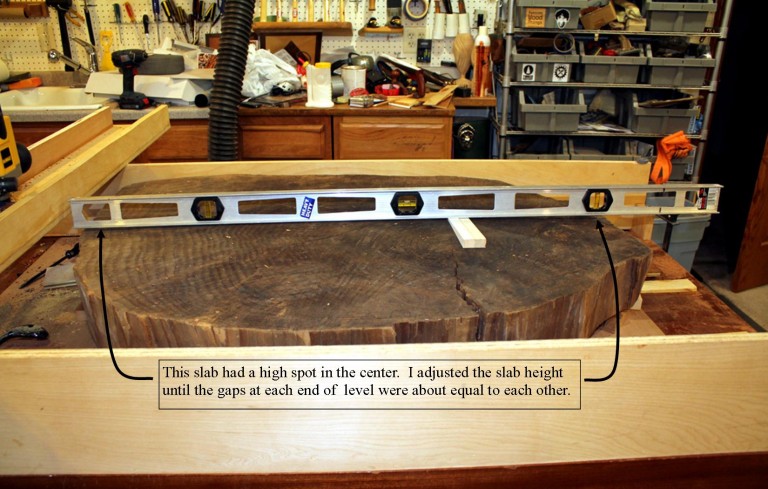
Generally, you want to remove the least amount of wood to create a level surface on the face of the slab. Your slab might be high in the middle, high on one end, or high on all sides and low in the middle. In my case the slab was low in the middle on one side and high in the middle on the other side. I placed small blocks of wood under one end and checked the top of the slab with a level. On the side that was high in the middle I adjusted the blocks until the gaps at each end of the level were about equal to each other.
This side of the slab had a high spot in the center. I adjusted the slab until the gaps at each end of the level were about equal to each other
Place guide runners on two sides of the slab
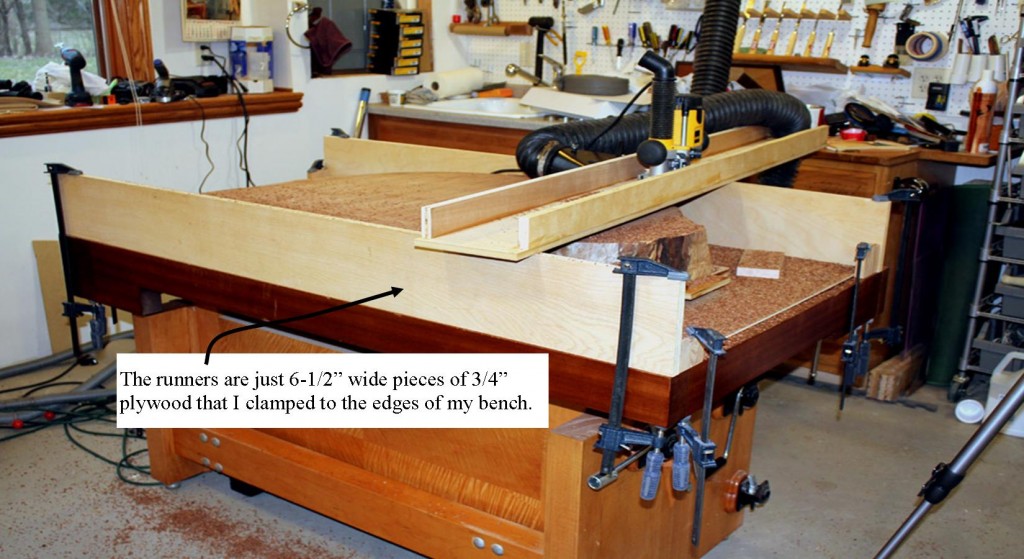
The guide runners are simply two straight boards that the router sled rides on. I made mine out of 3/4″ plywood. This part was easy partly because my workbench is wider than the slab. If your slab is wider than than your bench then you will have to find a way to mount the runners along side the slab.
Since most router bits are less than 2″ long, you will need your router to ride fairly close to the slab. My slab was about 5-1/2″ thick so I made the runners 6-1/2″ tall.
The runners are 6-1/2″ wide pieces of 3/4″ plywood that I clamped to the edges of my bench.
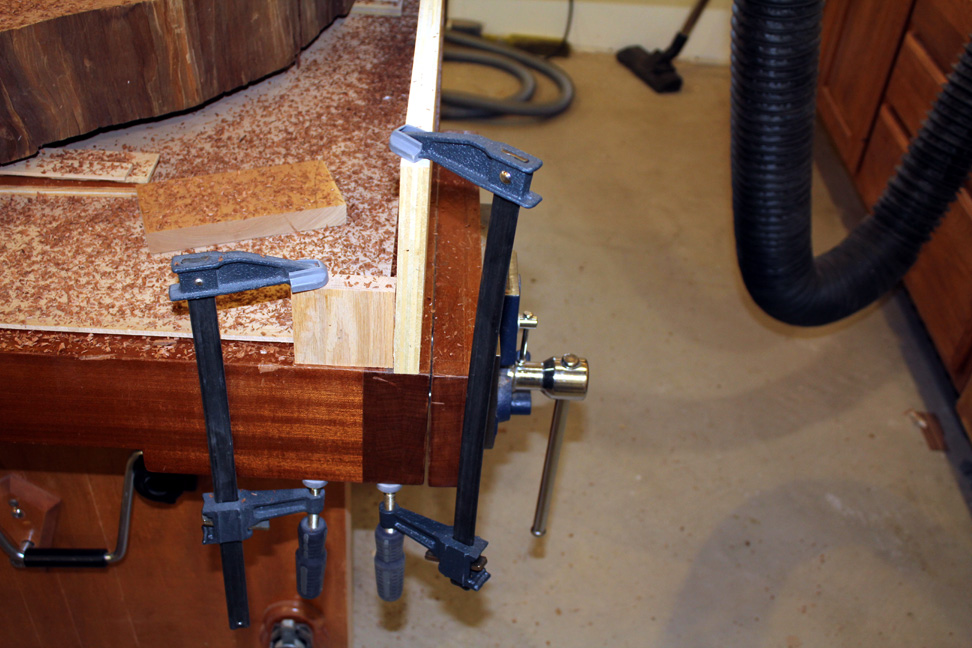
I didn’t want to take a chance on the runners falling off while I was routing to top of the slab! So, I glued small blocks on the ends to give myself another place to clamp them down. They were much more secure with these blocks and the extra clamps.
Blocks glued to the ends of the runners aided stability and added another place to clamp them down
The router and router bit
You can use any router with a 1/2″ collet, but it will be easier to adjust the depth with a plunge router. I like the DeWalt 621 router so much that I have 3 of them, but really any good plunge router will be just fine.
You will need a straight router bit that is at least 1-1/4″ long, but preferably one that is 1-1/2″-2″ long so that it is long enough to reach through the sled and still be able to trim the slab. There are specialized surface planing bits, but a regular straight mortising bit will be just fine.
Flattening with go faster and you will get a cleaner finish with a wide bit. The bit I used for this slab was 1-1/8″ wide and it worked great. I wouldn’t go much bigger than that for safety reasons. Speaking of safety, remember to slow your router speed down whenever you use a bit that is more than 1″ wide.
Here are the recommended speed ranges for various sized router bits.
• Up to 3/4″ height=”683″ />22,000 rpm
• 1″ 18,000 rpm
• 1-1/2″ 16,000 rpm
• 2″ 15,000 rpm
• 3″ 12,000 rpm
• 3″ or more 10,000 rpm or less
The router sled
The router sled is just a U shaped box. I made the bottom out of some 1/2″ melamine that I happened to have. I chose 1/2″ material to maximize the available plunge depth, and I chose melamine because it would slide easier than raw plywood. For the sides on this sled I glued a few pieces of 3/4″ plywood that were 2″ wide, these kept the sled stable and flat.
I drilled a hole in the center of the sled and bolted the router in place. The reason I did this is because it is easier to move the whole sled back and forth than it is to reach across and move the router. It is also easier to build a sled with a hole in the middle than it is to make one with a slot all the way across. Since I was going to move the entire sled back and forth the sled needed to be at least twice as long as the space between the runners. My workbench is 32″ wide so I made the sled about 64″ long.
It was sometimes kind of hard to see exactly where the bit was cutting. To make it easier I drilled a 1-1/2″ “window” in the bottom of the sled next to the router.
1-1/2″ hole in bottom of sled made it easier to see exactly where I was routing.
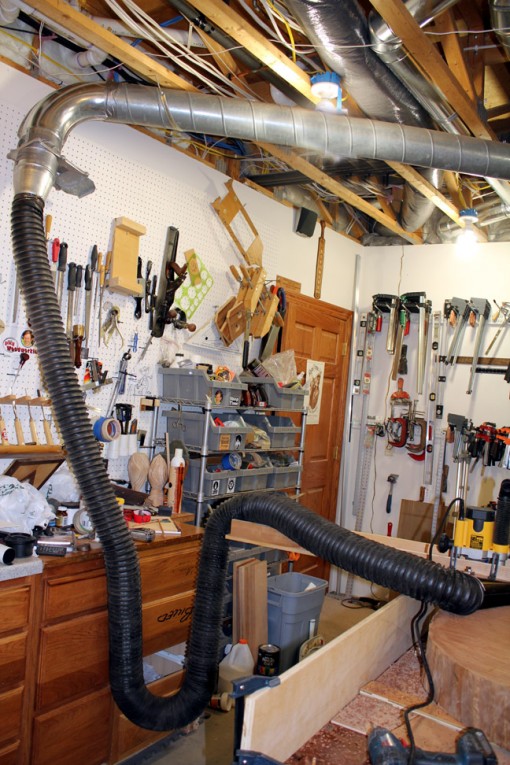
Dust Collection
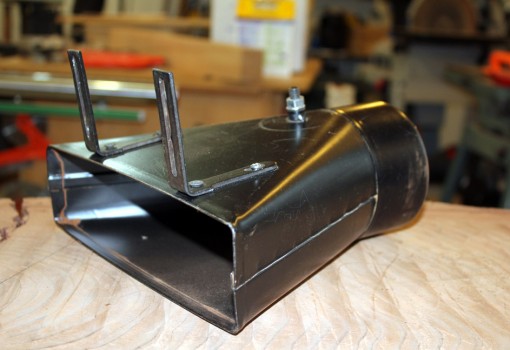
I attached a 4″ dust hood directly on the sled directly behind the router. I then attached a flexible hose from the hood to one of the lines on my dust collection system. This wasn’t perfect, but it collected about 80% of the dust.
4″ dust hood screwed to sled right behind router
Flexible 4″ dust collection hose connected to DC system
Routing
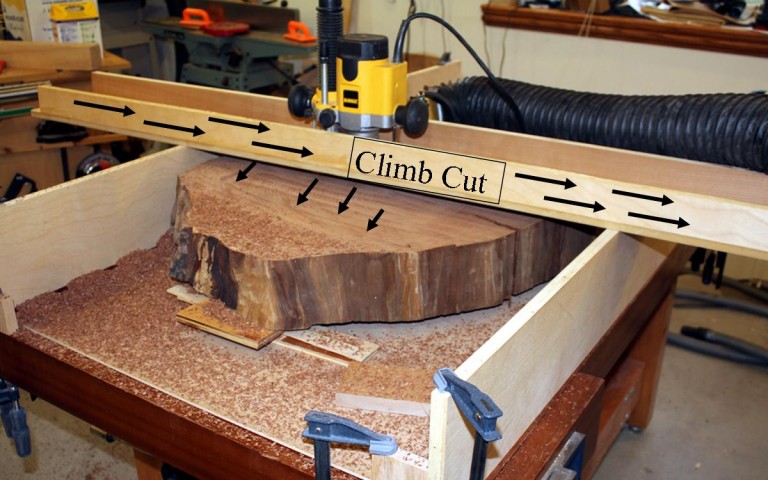
I used a “climb cut” when I flattened the slab to reduce tear out and to direct the chips into the dust hood. Climb cutting simply means moving the router in the same direction as the cutter.
CLIMB CUTTING CAN BE DANGEROUS BECAUSE YOU CAN LOSE CONTROL OF THE ROUTER OR THE PIECE BEING ROUTED!! However, due to its mass there was little chance of the slab uncontrollably jumping off the bench. And, with the weight of the sled and the fact that the walnut was fairly soft there was little chance that I would lose control of the router either.
Pulling the router in the direction of the arrows will result in a climb cut
That said, PLEASE DO NOT USE THE CLIMB CUTTING METHOD UNLESS YOU ARE FAMILIAR WITH IT! There is not enough room in this blog post to go into much more detail about climb cutting, but there are excellent explanations about it on the internet.
This walnut slab cut very easily. I took off about 3/8″ of material on the initial passes, but on the final pass I reduced that to about 1/8″ to improve the finish.
One other tip is that adding wax to the top of the runners will make much it easier to move the router sled.
Finishing up
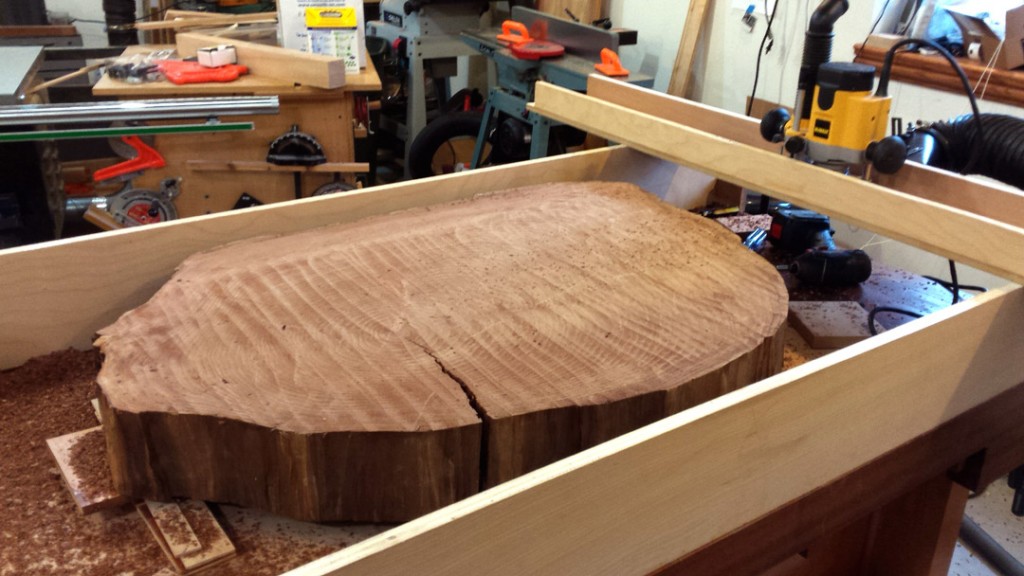
I am very happy with the results of using a router on this slab! It just needs a little cleaning up (including repairing the crack!) and it will be ready for a finish. Please don’t hesitate to contact me if you have any questions about this!
Here is how the slab looked right after I finished flattening with the router
https://jack-bench.com/wp-content/uploads/2016/05/Jack-Bench-Blog-Slab.jpg320400Charlie Kocourekhttps://jack-bench.com/wp-content/uploads/2016/10/Jack-Bench-Logo.pngCharlie Kocourek2016-05-17 23:16:462017-11-20 03:25:10Flattening a Walnut Slab on my Workbench with a Router
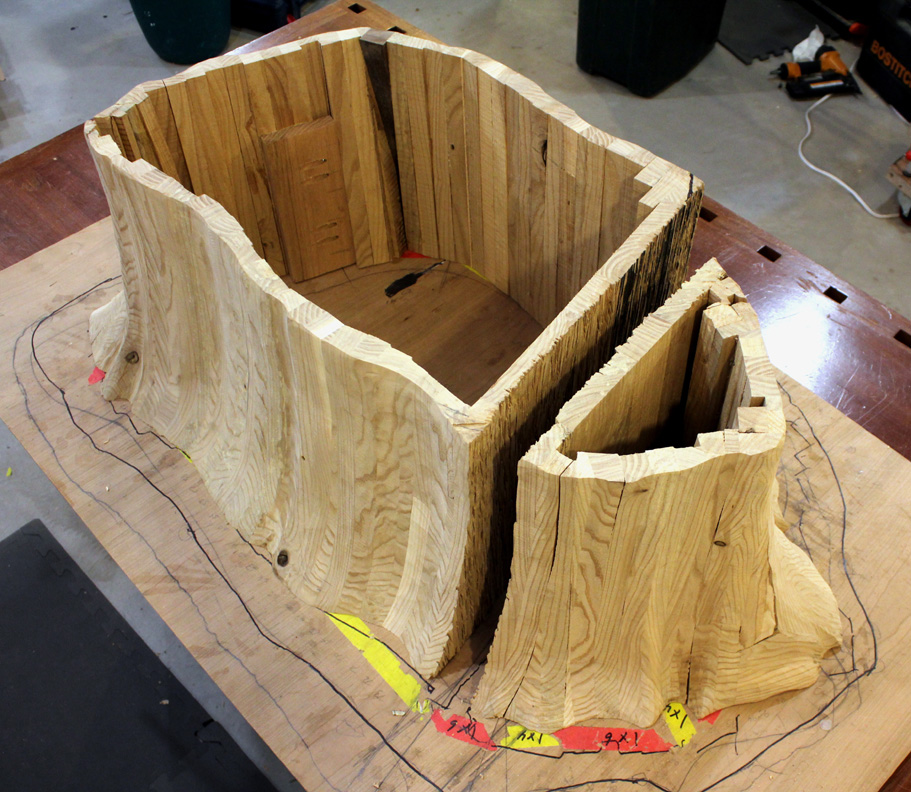
I wanted the slab coffee table to have a sculpted and carved base that looked kind of like a tree trunk. I also decided it would look more interesting if the base looked like a tree trunk that had split in half, so I made the base in two pieces. Since the slab had an open crack on one side I positioned the split in the base under the crack in the top to add continuity.
This is how the base looked after I assembled it and cleaned it up with an angle grinder.
I used stave (coopered) construction for the two pieces of the base.
I like working with templates, but usually I can get by without them. This was one of those projects where a template was not just “nice to have”, but absolutely necessary! There is no way I could have kept track of everything without some kind of a road map.
The plywood template was an invaluable tool for this project!
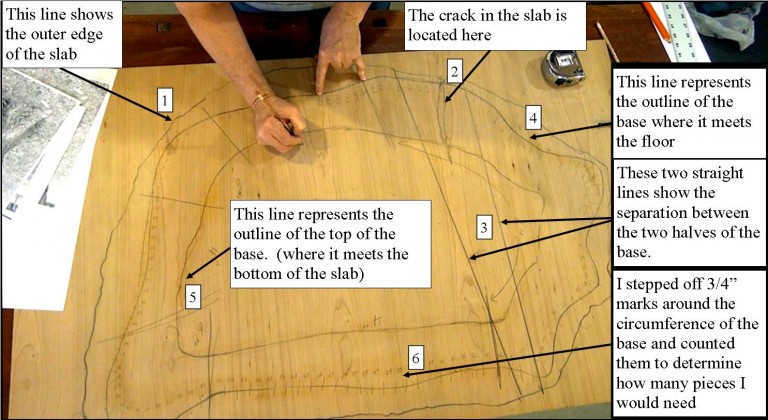
There are six critical pieces of information on the template:
The first thing I did was to trace the outline of the top on to the plywood. That is the outside line on my template.
I also located the crack in the slab on to my template.
I then drew two straight lines to show where there would be an opening between the two halves of the base.
Next, I drew a line showing the outline of the bottom of the base pieces.
It was also important to know the outline of the top of the base pieces where the slab would rest on the base. I used this information to draw the templates for the stave pieces.
It was easy to determine how many pieces (staves) were needed once the circumference of the base was drawn out.
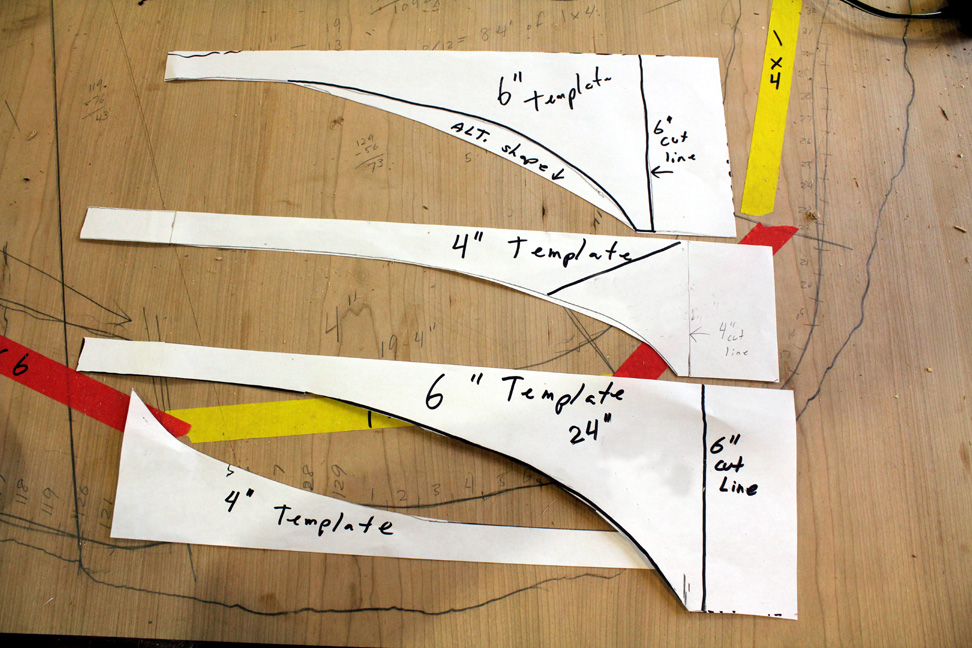
The plywood template represented the plan view of the base, but I also needed templates for the staves that would make up the sides of the base.
Paper templates for the two sizes of staves
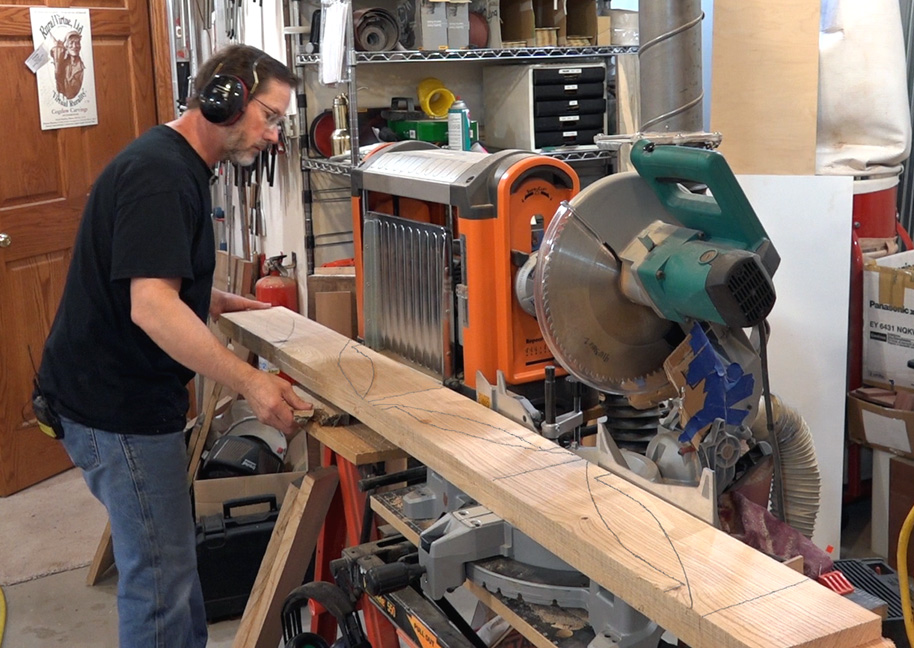
We all know what trees look like, but when it came time to sculpt one out of wood I suddenly had a lot of questions! I actually walked around my neighborhood and took pictures of trees and then used those pictures as a reference.
Trees flair out at the bottom so my table base had to flare out at the bottom, too. To make it to look more interesting and realistic I chose to have it flair differently at different points around the bottom. At some points, the flair was short and steep, and at other points, the flair extended out more. I decided to make two different size staves so that the rough shape of the base would be closer to the final shape that I envisioned. Once I determined where these would be and marked them on the plywood I could get a count as to how many of each size I would need. Assuming 3/4″ material it would take 114 pieces to construct the base!
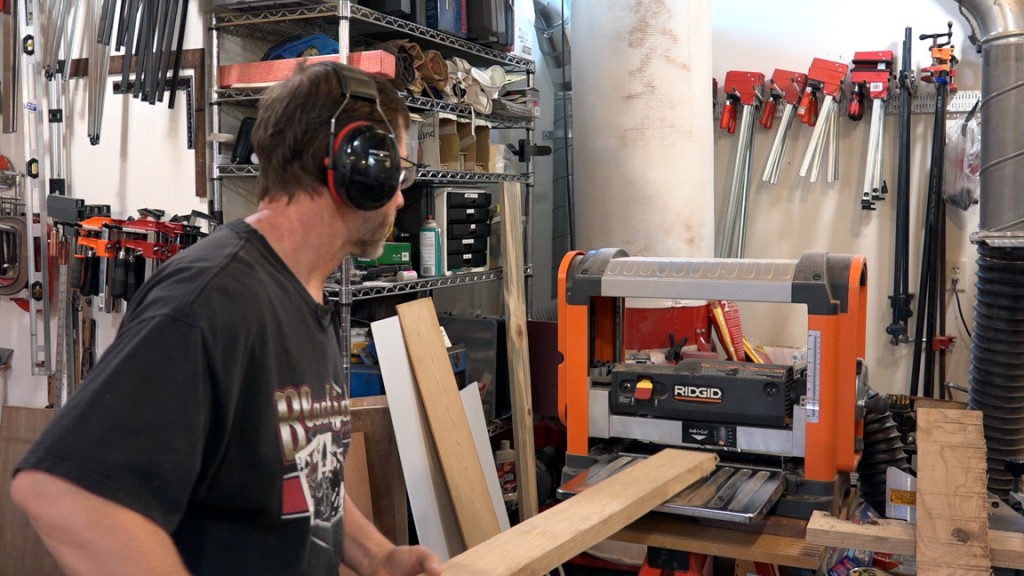
It so happened that I had a lot of rough sawn ash that had been milled into approximately 1×4’s and 1×6’s so it worked very well for this project. Since it was rough sawn it did require a lot of stock preparation before I could use it.
The boards were approximately 3/4″ thick after I planed them down.
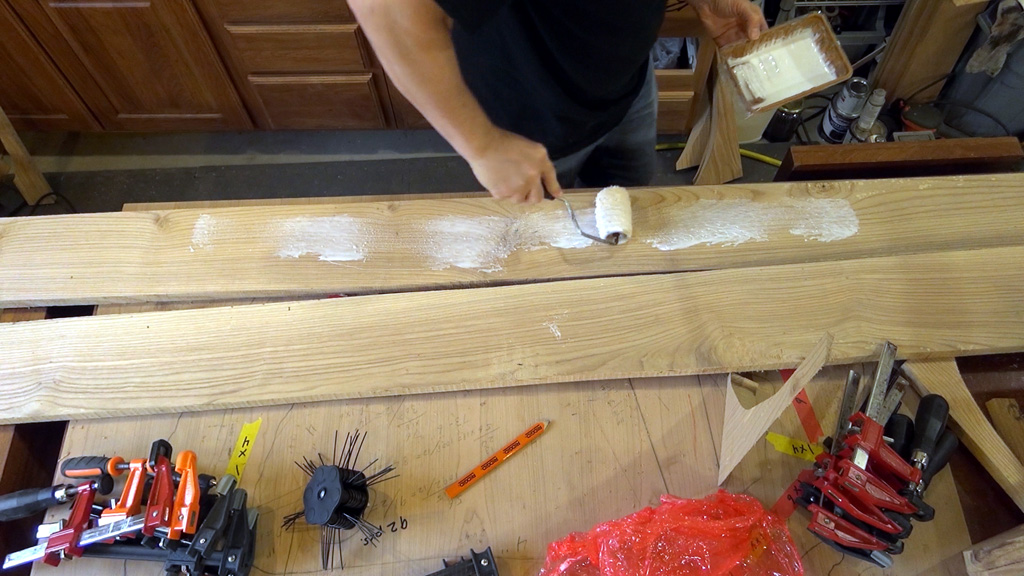
It was easier to glue some of the boards together BEFORE I started bandsawing out the individual staves.
I glued up some pieces that were 1-1/2″ thick and others that were 2-1/4″ thick
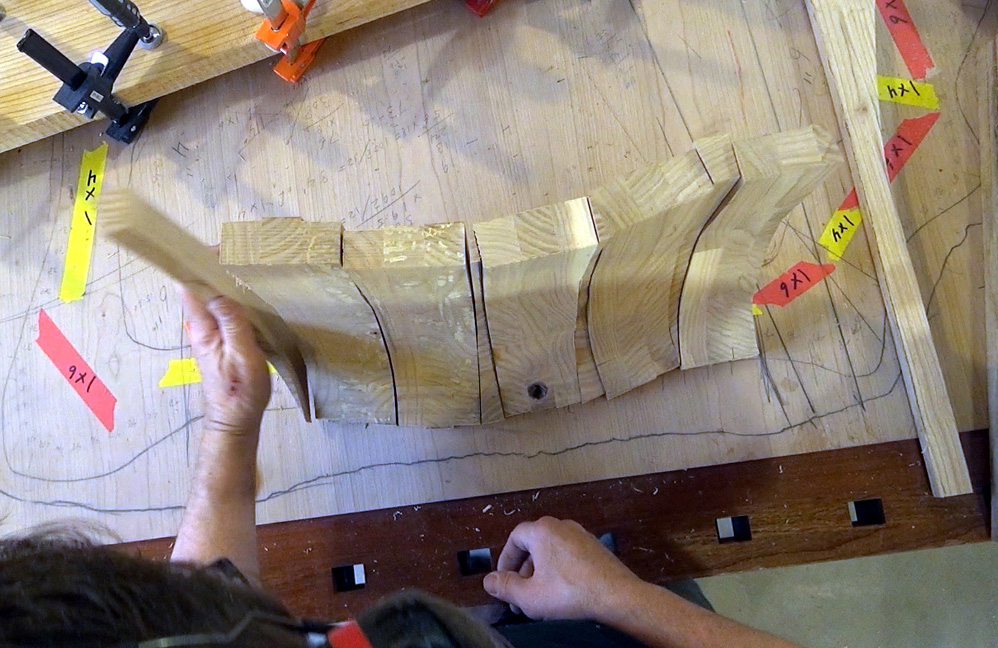
After I removed the clamps I used my paper templates to mark out the individual pieces.
Marking pieces using paper templates
The last thing I had to do before bandsawing the individual pieces was to cut out the blanks on the miter saw
Cutting pieces out on miter saw before bandsawing
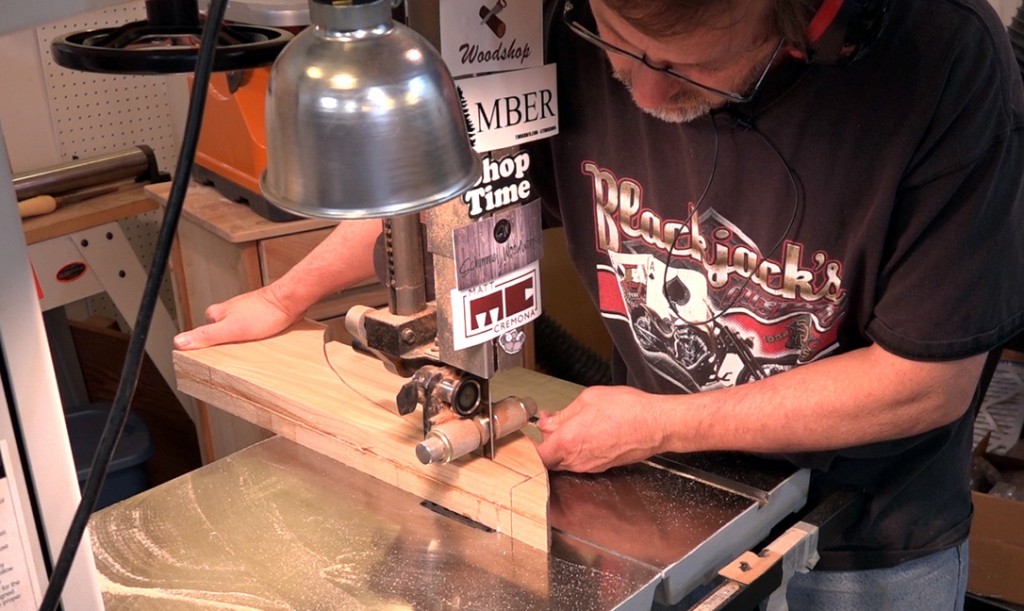
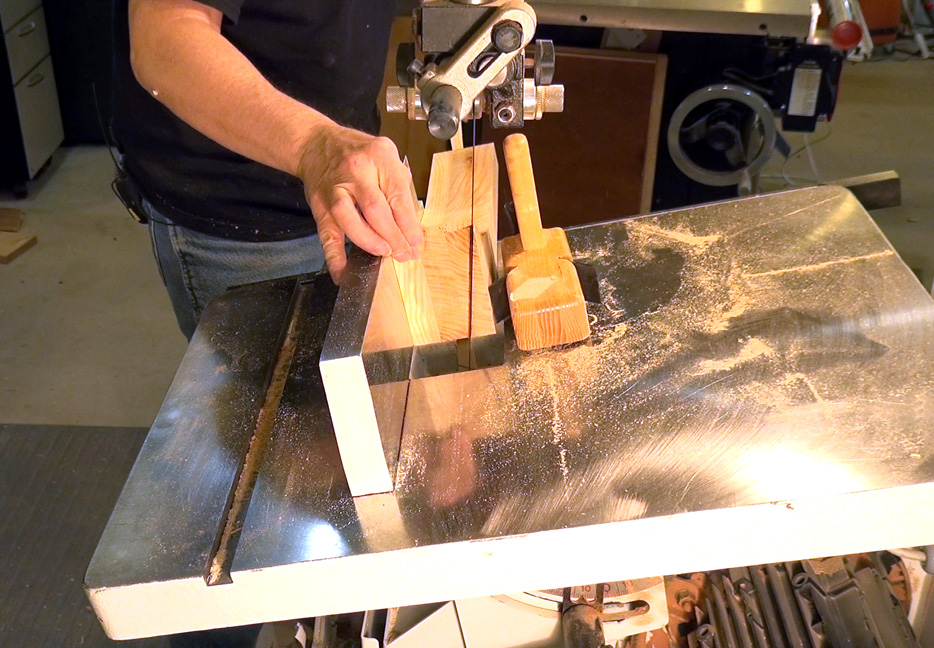
Most of the individual pieces would require two operations at the bandsaw. First was to cut out the shape and next was to cut them at an angle so that when I glued them together that they would match the outline on my the plywood template.
Bandsaws are great machines, but they can be very dangerous. Notice in the picture that my hand is not in front of the blade. Whenever possible, I like to pull the last few inches of a cut from the back rather than push it from the front. This keeps my hands out of harms way at that critical moment when the piece clears the blade.
Cutting the individual staves on the bandsaw
Bandsawing individual pieces at an angle
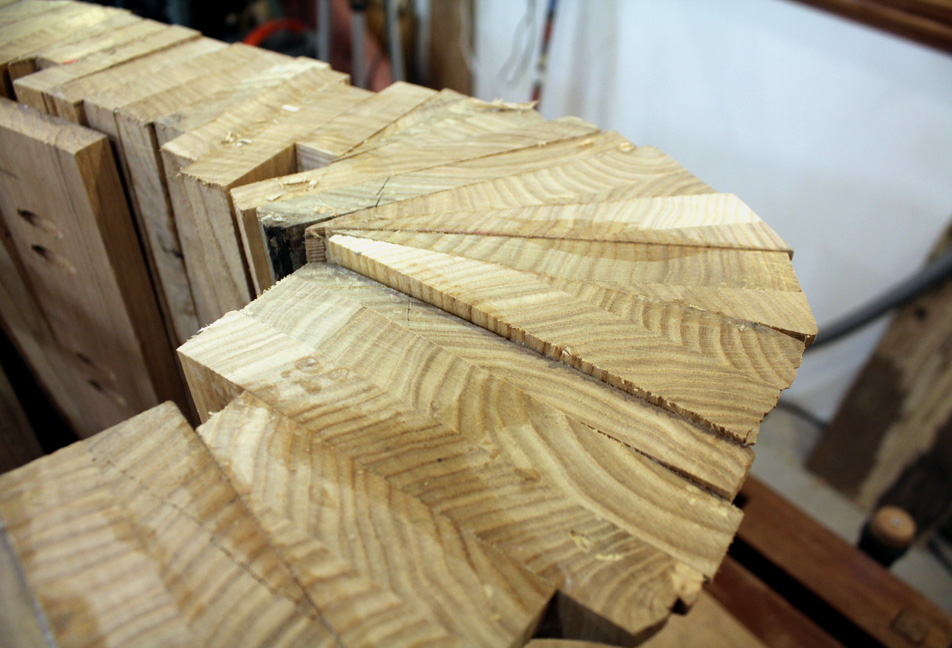
The plywood template was invaluable when it came to assembling the pieces. I used it both to determine what angle to cut the individual pieces and exactly where to place them.
Placing Staves on Template
You can see in this photo how the pieces follow the lines on the template
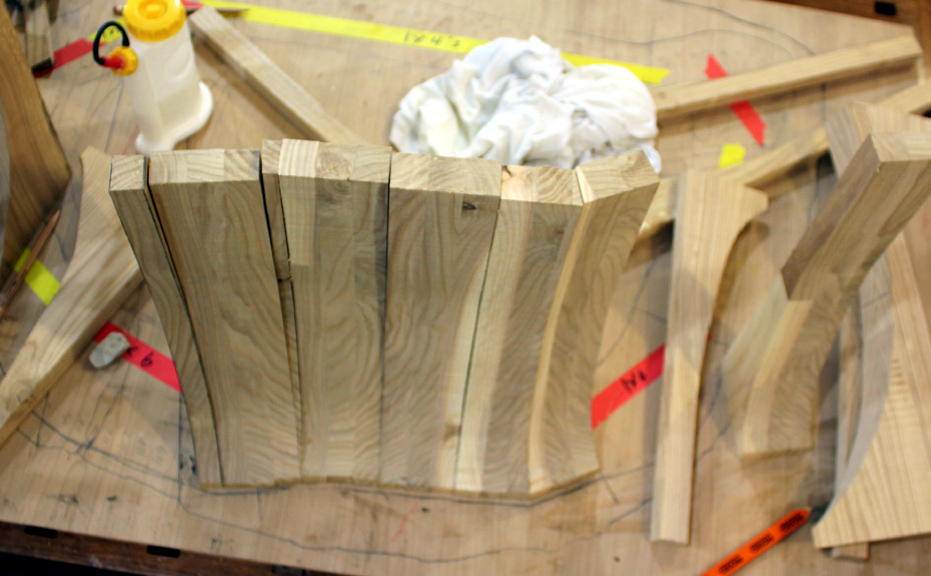
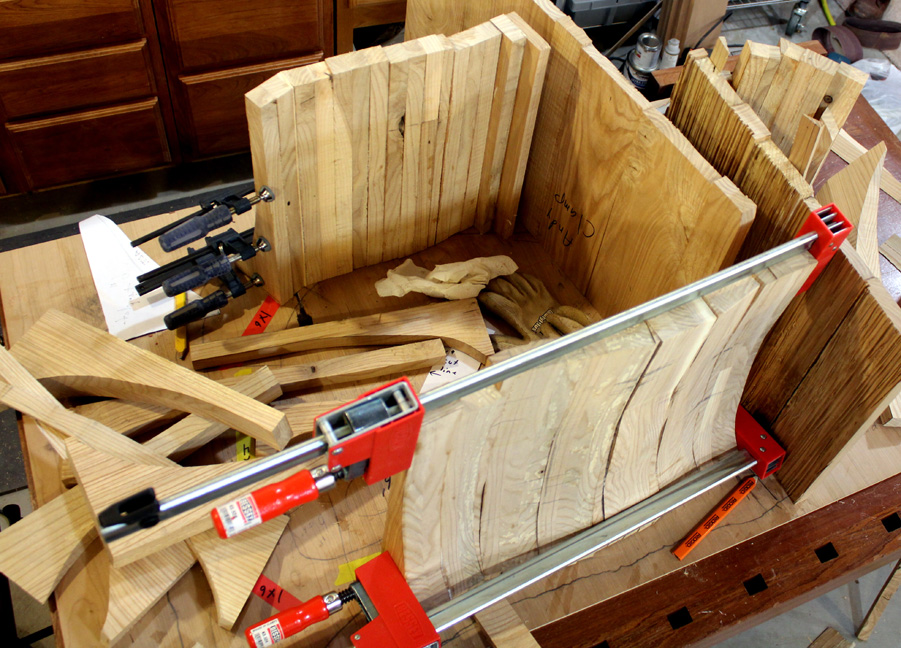
I glued the staves into small sections and then I glued those sections together to form the shape of the base. I used a variety of methods to clamp the pieces together. Clamping straight sections together was fairly easy.
Clamping straight sections together was pretty, well, straightforward!
Gluing curved sections together got a lot trickier! I used a band clamp where possible, but that didn’t always work. Sometimes I used lag bolts to screw blocks to the outside of the piece so that I would have something to hook the clamps on to. The screw holes were not problem since the finished piece would be painted.
The blocks screwed to the face of the boards gave me a place to attach the clamps.
I was pretty happy when I got the small section glued together. That was a real milestone!
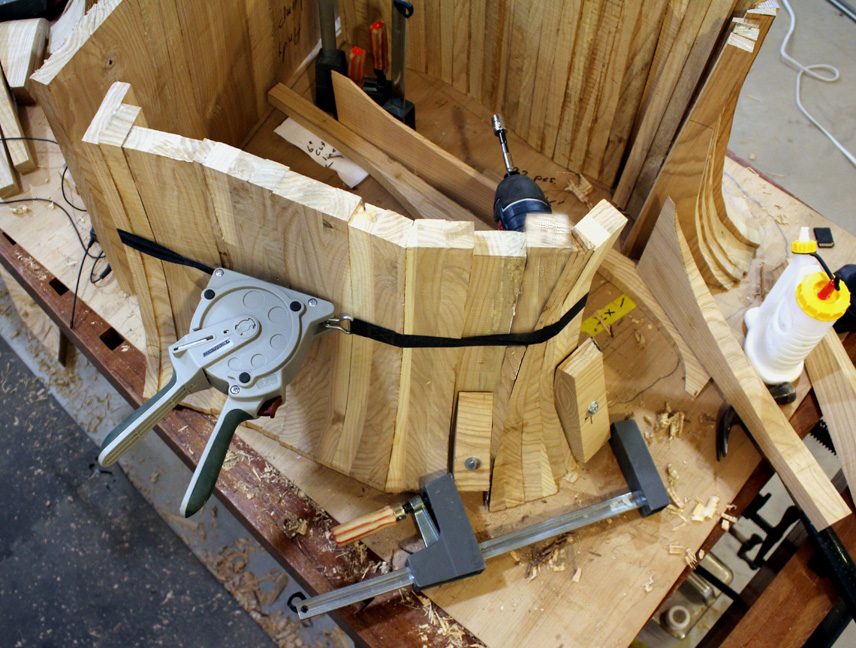
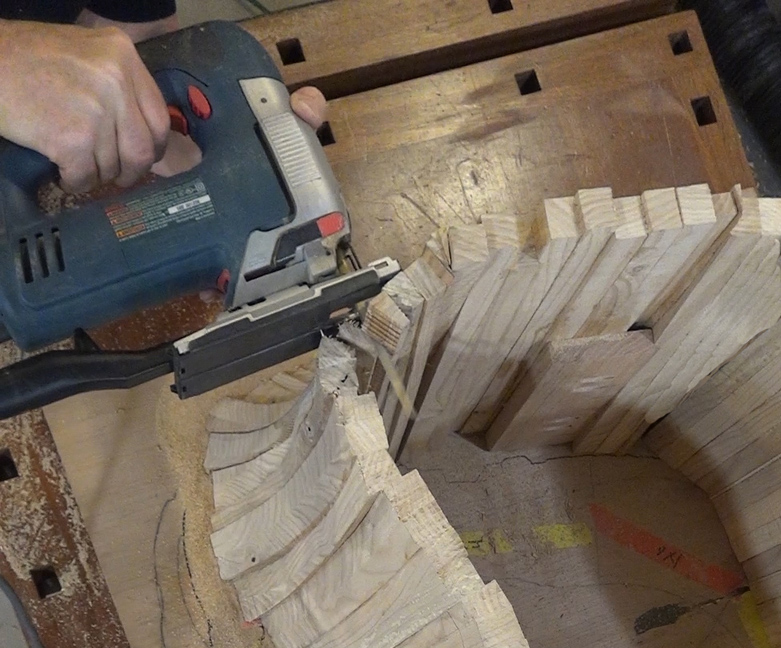
I purposely made the staves longer than they needed to be. This way the length of the staves didn’t have to be precise. Once each of the two halves of the base was constructed I trimmed them down with a jigsaw.
I used a jigsaw to trim the top
The bottom side on each of the two halves was not flat right after glue up. Again, I made them longer than needed to allow for flattening the bottom.
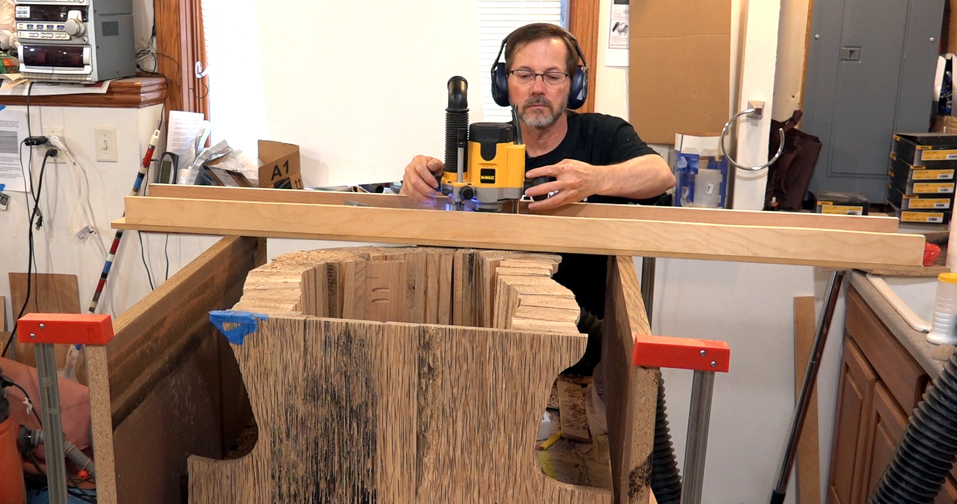
Bottom of base before flattening with the router jig
Once the tops were trimmed down I flipped the pieces over and secured them for flattening. Then I flattened the bottoms of the two halves with the same router jig I used to flatten the slab. I have a complete blog post on the router jig here: Blog Article – Flatten Wood with a Router Jig
Flattening the bottom of the base with a router jig
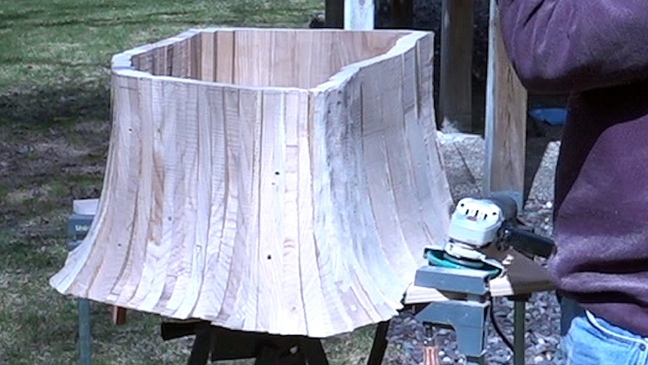
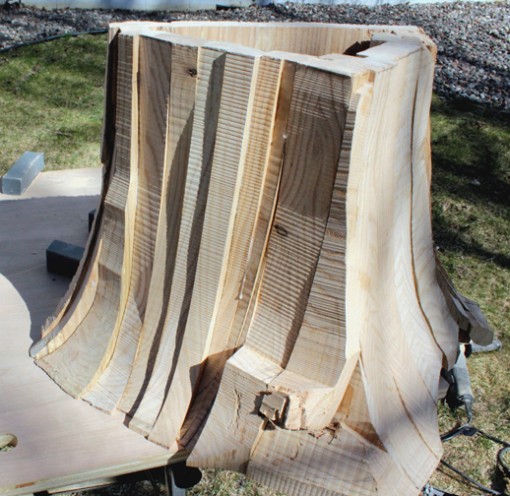
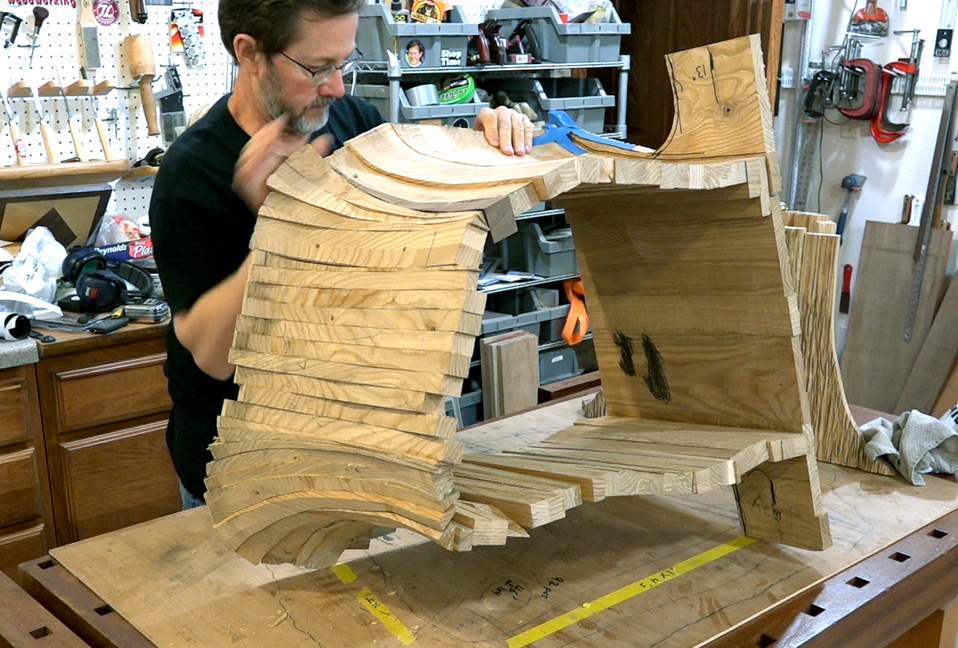
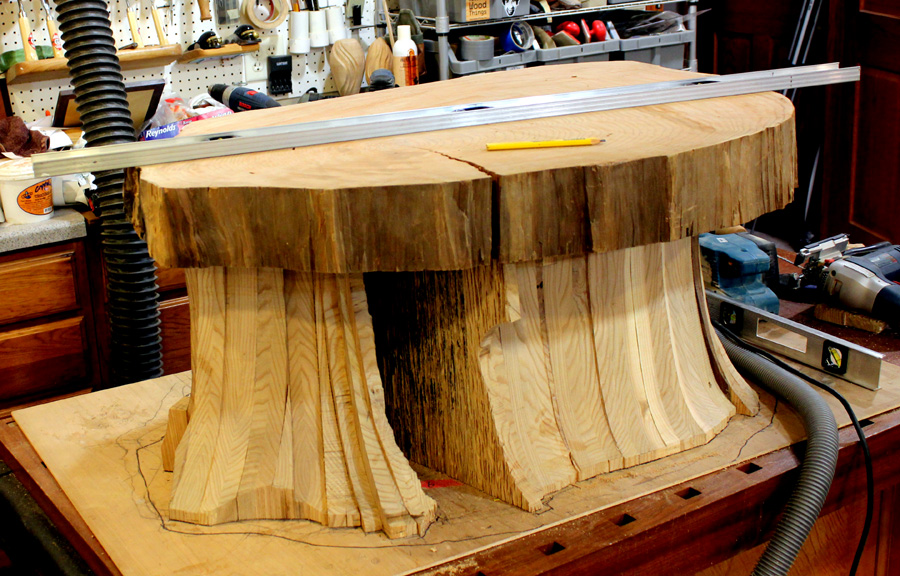
Ta-Da! This is how it looked right after construction.
Slab table before base is sculpted, textured or finished
Note: I got a very good result using the coopered (or stave) construction method, but it was quite time-consuming. If I make a similar project in the future then I might experiment with a different method, possibly stacked lamination.
The next blog article will show how I sculpted and textured the base pieces. The last thing I will do to the base is to add a metallic finish, and I have a pretty good story about that!