Posts
A work bench is an important part of a wood workers garage or workshop. It should be sturdy, easy to work with, and help make your shop time more enjoyable.
Here are a few common mistakes you should avoid while designing and building your workbench. I hope this is helpful!
1. Height
Workbench height is critical. Traditionally, people say that the bench height should be even with the knuckles on your hand when your is arm hanging by your side. That may be good for heavy hand work, but for most modern work that is too low. For most operations, the height should be close to waist height. I think my Adjustable Height Workbench is the best of all worlds. I can adjust it high for carving, marquetry, and other detail work. And I can adjust low for hand planning and even lower for assembly work. It is also nice to have an adjustable height bench so that kids, and grandkids, can comfortably work at it, too.
A realistic workbench height is about waist high
2. Wood Types
Many people spend a lot of time worrying about what type of wood to use, when in reality just about any type will be fine. Depending on your needs you could even use plywood, but personally I would not use plywood for the top. You want wood that is affordable, heavy, and easy to obtain. Most importantly, the wood should be dry. Wood that isn’t seasoned tends to warp and is more trouble than it’s worth.
3. The Wrong Vice
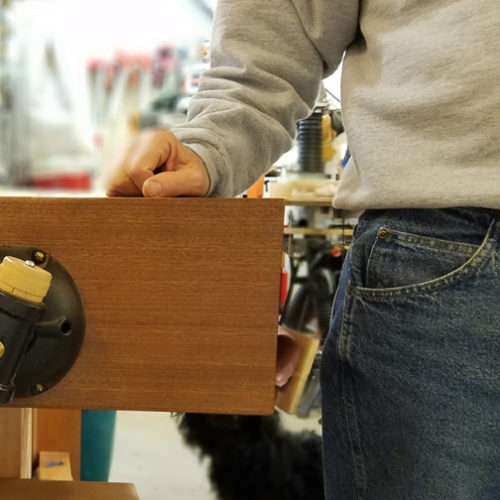
You will get used to whatever vise you have, but it’s nice to have a good high quality vise. Personally, I want my main vise to be either fast acting, or quick release. I am also so, so glad that I have an end vise on my bench. It is great for clamping things in between the dog holes. Also consider the type of work that you do. If you do a lot of carving then maybe a dedicated carving vise or even a pattern maker’s vise would be right for you. I get annoyed by people who say that this vise or that bench is the right for everyone. Sure, there are standard vises and standard configurations but it is YOUR bench and you should build it to suit yourself.
4. Dog/Holdfast Holes
Think about your specific end vise before deciding how far to space your dog holes. If you have a fast acting or quick release end vise then you can space the dog holes further apart, maybe 6″ or so. But, if your end vise takes a lot of turns to move a few inches then space them closer together, maybe about 4″ apart.
Holdfast holes are different. Put a few of them where you expect to do most of your work, and drill a few more later if you need them.
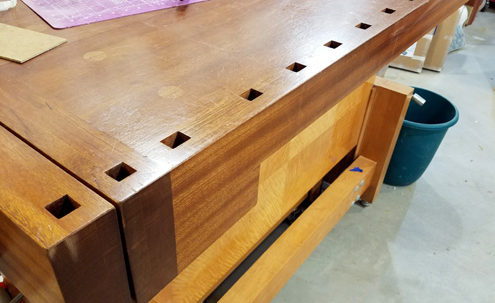
Dog holes spaced fairly close together
5. Waiting For Just The “Right Time”
I am the king of procrastination and sometimes I get analysis-paralysis. I am getting better about this and when I finally do get going I usually realize that I should have just dug in and got started! Don’t get me wrong, I am a big believer in getting your ducks in a row. And, my projects ALWAYS go better when am prepared. The go even better when I draw up a set of plans before starting. What I am saying is Just Do It!
6. Needing to Think I Can’t Build it Without “XYZ” Tool
This is similar to #5, waiting for just the right time. I LOVE tools and the tools available to us are absolutely amazing. As nice as these tools are, you don’t NEED them to great work. People have built great and sturdy workbenches for centuries. Before Festool, before CNC’s, even before electricity. Yes, get the best tools you can afford, but you can do a lot with just an ordinary circular saw.
7. Doing it All Alone
A nice bench can be a big project. My own tendency is to do everything all by myself, and it is hard for me to accept help. But sometimes asking for a little help is the smart thing to do.
8. Stressing about a “Nice” Bench
No matter how beautiful and nice your workbench is, it is still a work bench. This is a place to make beautiful things, not “necessarily” your most beautiful piece of work. When I built my bench I wanted to show it off so I made it beautiful. I’ve never regretted making a nice workbench, but I have to admit that it took me a while before I was able to relax and just use it!
The bottom line is that a sturdy, reliable, and hopefully ergonomic workbench is the foundation of your craft. Have fun and I hope your bench comes out great!
The inspiration for this article was from a guest post that I received from Isaac Atia, author at 10BestRanked, where he reviews the top home and outdoors products.
It is almost a rite of passage that at some point in time a woodworker should construct their own workbench. While it can seem like a bit of a daunting task–especially since you will ultimately rely on it for all of your future woodworking projects–building your own workbench is really the only way to go.
Aside from the fact that you can have pride from having built your workbench by hand, there is a host of other benefits and reasons for why you should build your own workbench. In this article, we will run through some of the best reasons why you should build your own workbench.
Customization
Everyone has their own ideas of what the best workbench should be. While there may be one or two workbenches that you can buy that entice you, chances are there are at least a couple things about the workbench that you would change if you could. Thankfully, if you build your own workbench, that is no longer an issue. By building your own workbench, you are given the freedom to design it however you want.
Workbench Height
It is important that your bench fits you and the way you work. A bench that is too high or too low for you can lead to back aches, or worse. You might consider an Adjustable Height Workbench. Regardless, please be sure that your bench is the right height for YOU.
David’s DIY Adjustable Height Workbench
Workbench Size
Not all people have the same amount of space in their workshop. Some people might be lucky enough to have a glut of room in which to work, but most people have to deal with the reality that workshop real estate comes at a premium. Of course, if you build your own workbench, you make it as large or as small as you desire.
Workbench Design
This can be approached from a couple different angles. First, if you are already somewhat of a skilled woodworker, you can ensure that your workbench is truly a piece of art. By adding a number of aesthetic touches, your workbench will stand out as a unique piece that has not been replicated elsewhere. This alone can make the workbench become a family heirloom to be passed down from generation to generation.
Of course, the other primary design benefit to building your own workbench is the fact that it can have whatever additional qualities you decide. If you need more storage space than most workbenches provide, that is no longer an issue. Holes and dowels are also left up to your imagination and the physical limitations of your workpieces. You can also add some genuinely practical and high-quality vices.
Bench Quality
One of the biggest reasons to build your own workbench comes down to craftsmanship. While there are plenty of manufacturers that produce high-end workbenches, they often tend to be well over $100 dollars. Once you start getting too low in price, you find that the quality of the workbench no longer justifies its price. By building it yourself, you can make sure that the workbench maintains a high standard.
Workbench Materials
One of the biggest issues with pre-bought workbenches is that they often use mid to low grade wood unless you are willing to shell out serious cash for quality hardwood. Even then, most pre-made workbenches get their wood from tree farms which rarely allow the wood to fully mature before harvesting it. When you build your own workbench, you are able to make sure you use only the best wood.
Techniques
Even if the company uses a decent quality of wood, that does not guarantee that they use the best techniques to construct or manufacture the workbench. One of the biggest issues with workbenches is that they are often not flat. By making it yourself, you can ensure that the workbench is both stable and flat. You can also go so far as to build it without using hardware to fasten it together–an uncommon practice for prefab workbenches.
Workbench Cost
This one can be a bit hit-or-miss. If you have access to high-grade hardwood that properly matured before being harvested, then it is a no-brainer: it is cheaper to build your own workbench. That said, if your region does not grow top-tier hardwood and you have to purchase imported wood, it will often be similar in price to a prefab workbench.
Practice
The whole point of woodworking is to increase your skill with making wooden projects. What better way to do this than to work on a project that you will use, and what project will you end up using more than a workbench? Not only are you liable to pay close attention to your techniques and craftsmanship, you are likely to learn a great deal about the craft itself along the way.
Conclusion
Whether you want the workbench to be just so or you simply want to make sure that it is exceptionally high-quality, there are plenty of reasons to build your own workbench instead of buying a prefabricated one. On top of the quality and customization, the price of making your own workbench is often less or similar to one that you would purchase.
One thing to remember is that you should build the bench for the woodworker you hope to become not the woodworker that you currently are. Since a solid workbench can last you decades, make sure that the workbench is built for projects you hope to build a decade from now or longer. The best way of doing this is by acquiring a solid set of workbench plans–remember, you can always “improve” on them too.
James Niehaus
A BIG THANKS to Jim at Perfect Cuts and Miters for offering this guest post for the Jack Bench blog page!
Why I Designed this Workbench:
I had a few problems with my first workbench. It was too low for carving or for detail work, it was too high for assembly, it was also too high to sit behind my table saw, and it was difficult to move around. It was anything but ergonomic!
After some thought, I concluded that an Adjustable Height Workbench could solve all of these problems. I then searched the internet to find one. The only option I found was unacceptable to me because it was slow and difficult to actually adjust the height. I decided to design and build one myself, and so my journey began.
The first thing I did was to set some criteria, things that this new bench must have to make it worth the effort. Here is what I came up with:
- First and foremost, it must be a REAL workbench. I wanted an end vise, dog holes, and a nice quick release face vise.
- It would have to have at least 12″ of height adjustability to make it worthwhile.
- It had to be as solid as possible. I would no longer tolerate a bench that moved around while I was working
- It had to be EASY TO USE! I know myself enough to know that if it took more than a few seconds to adjust the height that I would just continue to work in an awkward position until my back gave out. Others might say it’s because I am too lazy, I prefer to think of it as efficient, as in “I can’t waste the time…”.
- It had to be mobile. My shop is small and I have to be able to move things around. And, moving it had to be easy! (see above about laziness, er, efficiency)
The Workbench Design
I had no idea what the bench would look like, but I was determined to meet all of my criteria. I gave this a LOT of thought, in fact, I couldn’t stop thinking about it. My mind went from one idea to another and it kept me up at night, literally. I researched workbenches, I read books and asked other woodworkers what they thought the perfect workbench would look like.
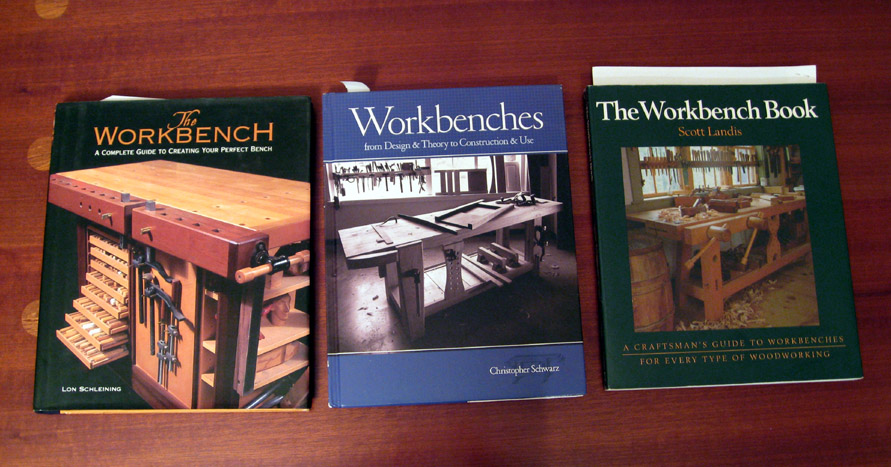
I read books by Scott Landis, Lon Schelling, and Christopher Schwarz. Chris Schwarz’s book is quite good, but it had too narrow of a focus for what I wanted. The Lon Schelling and Scott Landis books are quite similar, but my favorite of the three was The Workbench Book by Scott Landis. The reason I liked this one the best is because he was not stuck on any one particular design. He did not try to say that any one work bench design was best for everyone. What he did instead was to show all sorts of different workbenches and explain their benefits.
After all the research and all the time working on it I finally got a design in my head, but I had to make a cardboard model to see how it would actually go together.
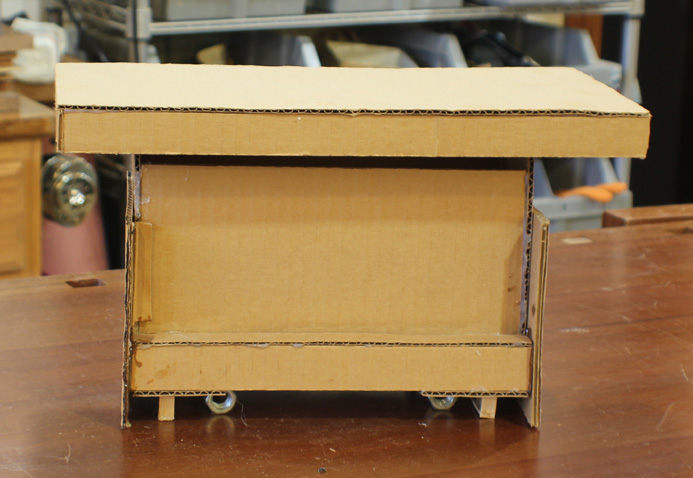
Cardboard Workbench Model
I worked with the model and developed the design until it perfectly met all of my criteria; solid, functional, mobile, ergonomic, easy to operate, and plenty of adjust-ability! What I came up with is a bench with rectangular legs that slid past each other. Some people would describe the legs as “telescoping”. These two sets of legs are held in place with some ordinary pipe clamps. I simply loosen the clamps and adjust the jack to change the bench height. When the bench top is where I want it, I snug up the clamps and the bench is as solid as a rock!
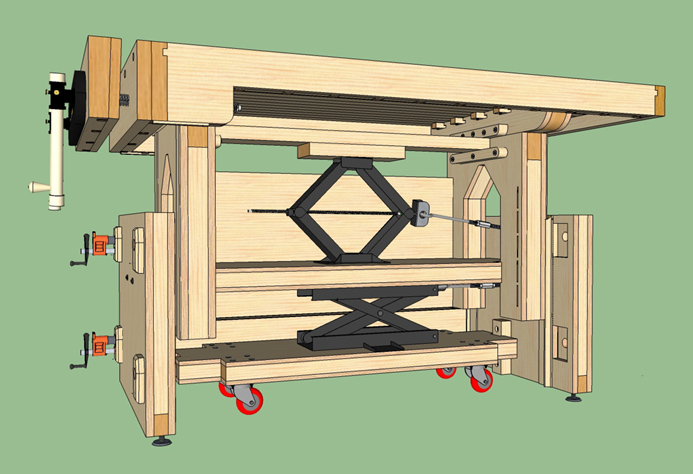
Bench Drawing with Parts Removed for Clarity
You will notice in the drawing above that there are two scissors jacks. The primary jack adjusts the height of the bench top and the other one lifts the entire bench up on to a cart that is nested below the bench.
Actually, if you look closely you will notice that the design in the drawings is slightly different than the design of the bench in the photo. The difference is that the first design, the one in the photo above, has one stretcher and the upper set of pipe clamps go through the inside of the base. On the second, improved design, there are four stretchers and the pipe clamps are concealed inside of them. The revised design is much easier to build than the original one.
Sketchup Drawing of Jack Bench
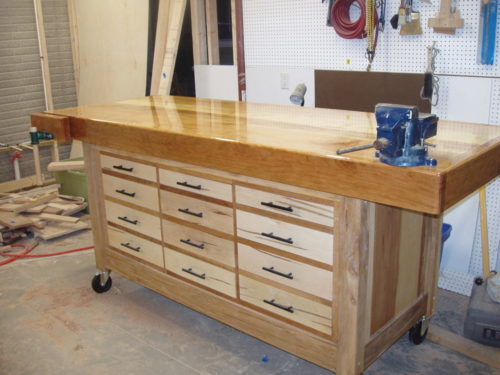
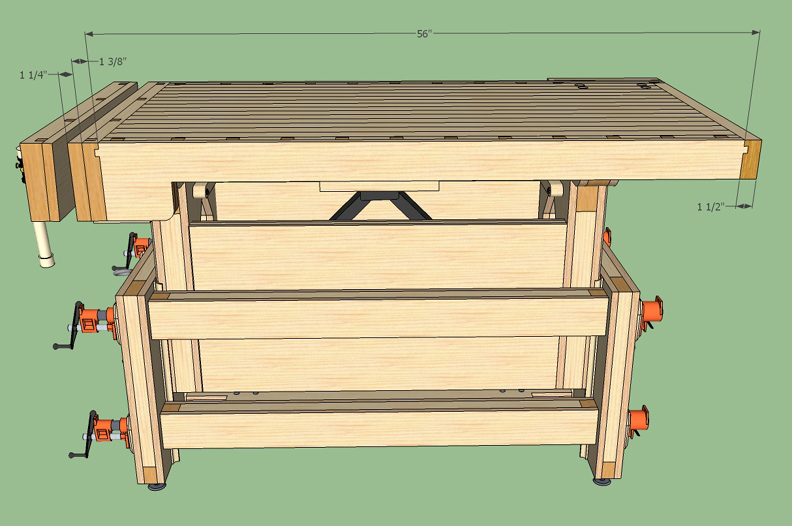
The bench top includes everything I wanted, a quick release face vise, bench dogs, and a twin screw vise that doubles as an end vise for the bench dogs.
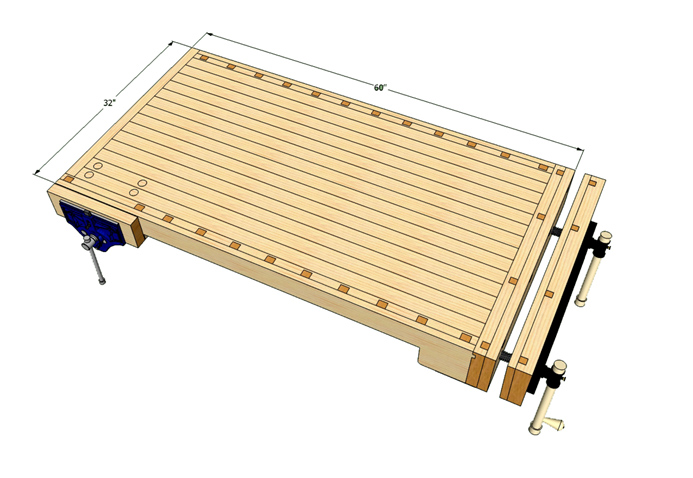
Bench Top Overview
I am thrilled with how the design turned out! I am proud to say that over a thousand people have purchased plans for the Jack Bench since I first designed it. Following are a few photos of benches that others have built from my plans.
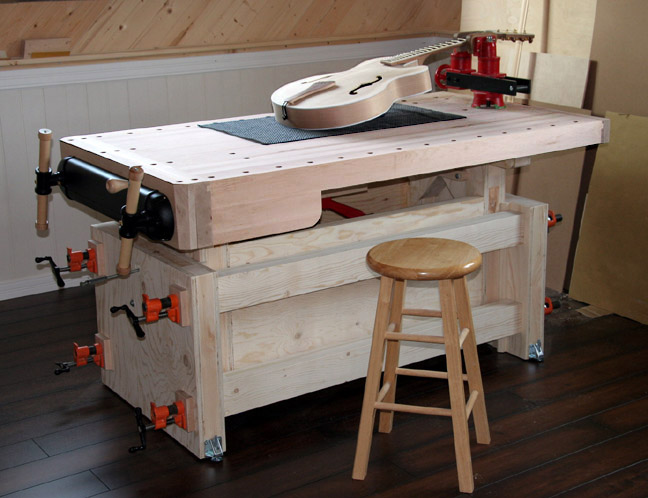
Jack Bench that Serge Lachapelle built from a set of my workbench plans
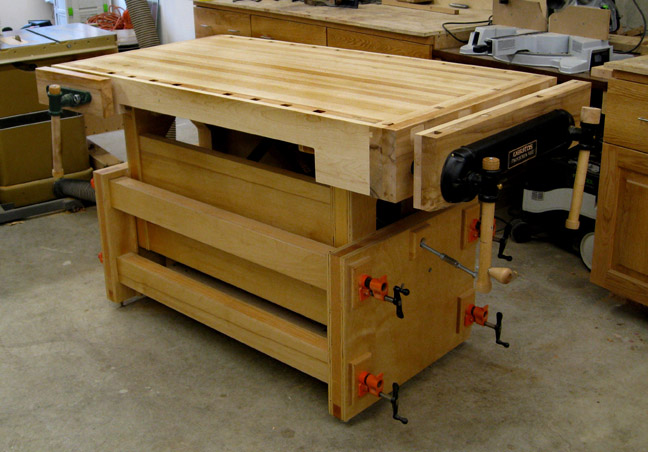
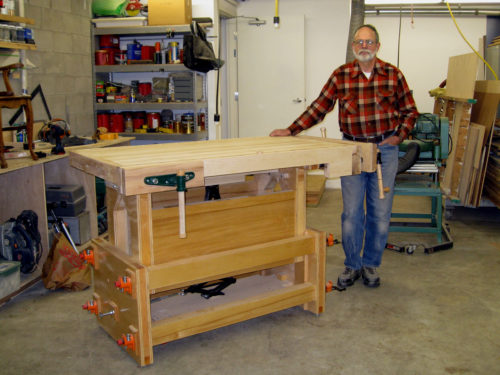
David Root’s Adjustable Height Workbench
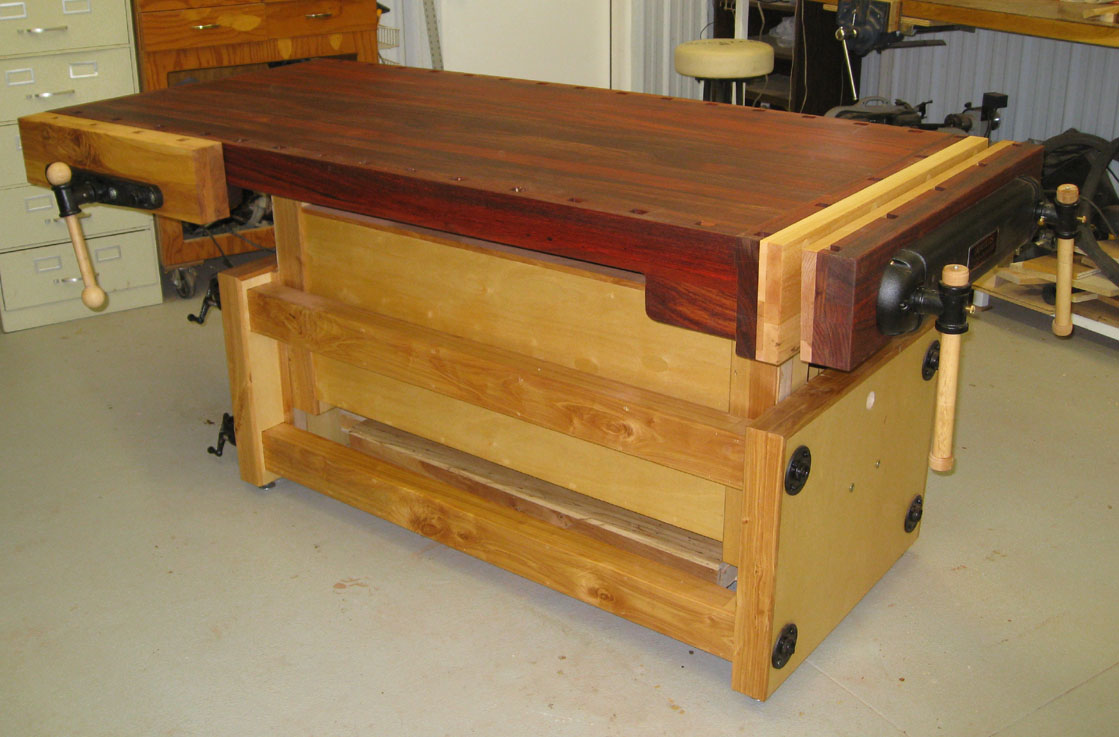
Kevin’s Adjustable Height Workbench
You can see many more examples of benches that others have built from my plans at my photo gallery.